Homemade Bread for Beginners: Simple Steps to Bake Your First Loaf
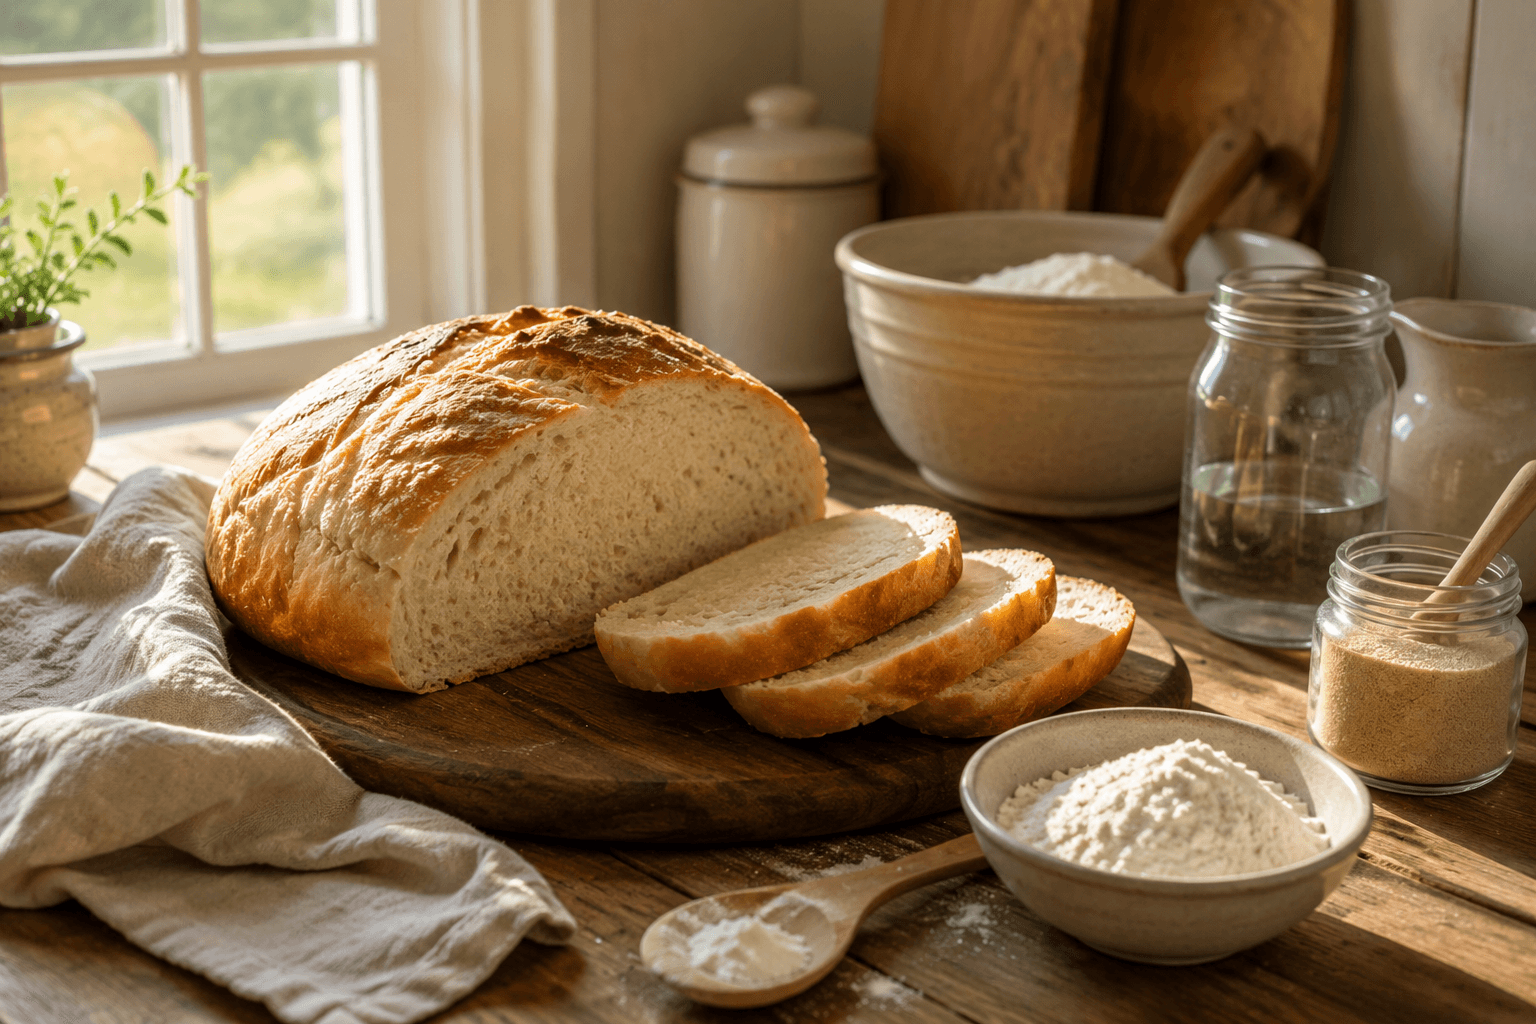
Homemade bread for beginners does not have to feel intimidating. You do not need a professional kitchen, special equipment, or years of baking experience to make your first simple loaf. With flour, yeast, water, salt, and a little patience, you can turn basic pantry ingredients into warm, fresh bread at home.
Bread making is one of those old-fashioned kitchen skills that feels both practical and comforting. It teaches you how simple ingredients work together, helps you rely less on store-bought bread, and makes your kitchen feel warm and lived-in. Even if your first loaf is not perfect, it will teach you something useful.
Many beginners worry about yeast, kneading, rising time, or getting the texture right. The good news is that homemade bread is much more forgiving than it seems. Once you understand the basic steps, you can bake bread again and again with more confidence.
In this guide, you will learn how to make homemade bread from scratch, what each ingredient does, which tools you need, how to avoid common beginner mistakes, and how to bake a simple first loaf you can actually feel proud of.
Why Homemade Bread Is Worth Learning
Homemade bread is one of the most useful kitchen skills you can learn. It is simple, affordable, practical, and deeply satisfying. A fresh loaf of bread can turn a basic meal into something cozy and filling.
Bread also fits naturally into a more self-sufficient lifestyle. You may not be able to grow all your food yet, keep animals, or own land, but you can still learn skills that make your home more capable. Baking bread from scratch is one of the most easy homesteading skills for beginners because it builds confidence in the kitchen with simple pantry ingredients.
A basic loaf uses ingredients many people already keep at home: flour, water, yeast, salt, and sometimes a little sugar or oil. Once you understand the process, you can make sandwich bread, rustic loaves, dinner rolls, pizza dough, flatbreads, and herb breads.
Homemade bread can help you:
- Use simple pantry ingredients
- Save money over time
- Reduce reliance on store-bought bread
- Build confidence with from-scratch cooking
- Make your kitchen feel warmer and more intentional
- Control what goes into your bread
- Use leftover bread in practical ways
- Learn a skill that supports simple living
Learning to bake bread is also a practical way to start homesteading in an apartment because it does not require land, a garden, or outdoor space. You only need a kitchen, a mixing bowl, and a little time.
Basic Ingredients for Homemade Bread
Bread looks simple, but each ingredient has a job. Understanding what each one does will make the process much easier.
Flour
Flour is the base of bread. It gives the loaf structure. You can use all-purpose flour or bread flour for a beginner loaf.
Bread flour has more protein, which can help create a chewier texture and stronger dough. All-purpose flour is easier to find and works well for a simple homemade bread recipe.
If this is your first loaf, start with all-purpose flour or bread flour before experimenting with whole wheat flour. Whole wheat bread can be delicious, but it often needs more moisture and a slightly different method.
Yeast
Yeast is what makes bread rise. It feeds on sugars in the dough and produces gas, which creates air pockets and helps the loaf become light instead of dense.
You will usually see two common types of yeast: active dry yeast and instant yeast. Both can work for beginner bread. Instant yeast can often be mixed directly into the flour, while active dry yeast is usually dissolved in warm water first.
If your bread does not rise, old yeast is one of the first things to check.
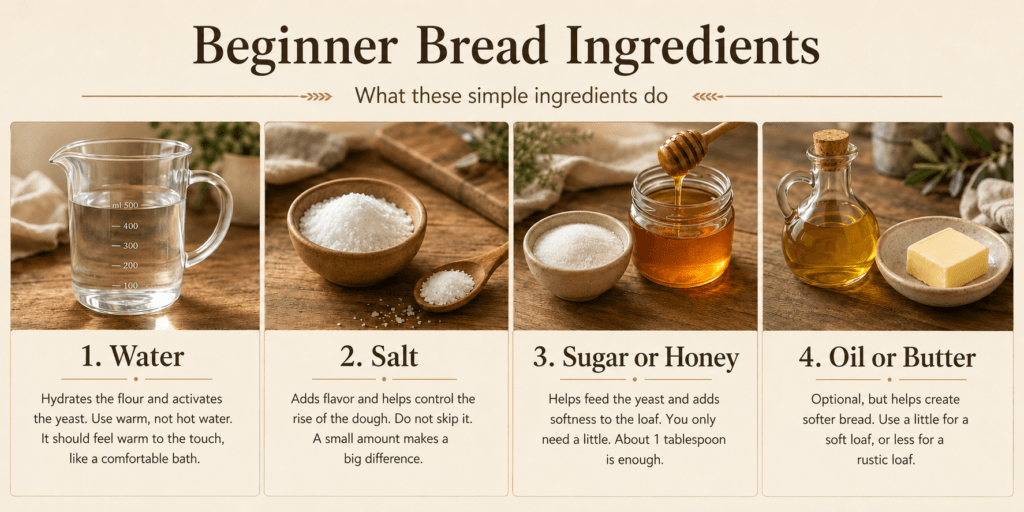
Water
Water hydrates the flour and activates the yeast. The water should be warm, but not hot. If it is too hot, it can damage the yeast. If it is too cold, the dough may rise slowly.
A good beginner rule is to use water that feels warm to the touch, like a comfortable bath, not hot.
Salt
Salt adds flavor and helps control the rise of the dough. Without salt, bread can taste flat and bland.
Do not skip the salt, but also do not add too much. A small amount makes a big difference.
Sugar or Honey
Sugar or honey is often added to beginner bread recipes because it can help feed the yeast and add softness to the loaf. It also gives the bread a mild flavor.
You do not need much. A tablespoon is enough for a simple loaf.
Oil or Butter
Oil or butter is optional, but it helps create a softer bread. Olive oil, vegetable oil, or melted butter can all work.
For a soft sandwich-style loaf, adding a little fat is helpful. For a rustic crusty loaf, you may use less or none.
Tools You Need to Make Homemade Bread
You do not need fancy equipment to make homemade bread. Many people imagine bread making requires a stand mixer, special pans, or professional tools, but a basic loaf can be made with simple kitchen items.
Helpful tools include:
- Large mixing bowl
- Measuring cups or kitchen scale
- Wooden spoon
- Clean towel
- Loaf pan or baking sheet
- Oven
- Cooling rack
- Sharp knife
- Optional bench scraper
- Optional kitchen thermometer
- Optional stand mixer
A stand mixer can make kneading easier, but it is not necessary. Kneading by hand is a good way to learn how dough changes as it develops.
If you do not have a loaf pan, you can shape the dough into a round or oval loaf and bake it on a baking sheet.
The Simple Homemade Bread Process
Bread making becomes less confusing when you understand the basic process. Most simple yeast breads follow the same steps.
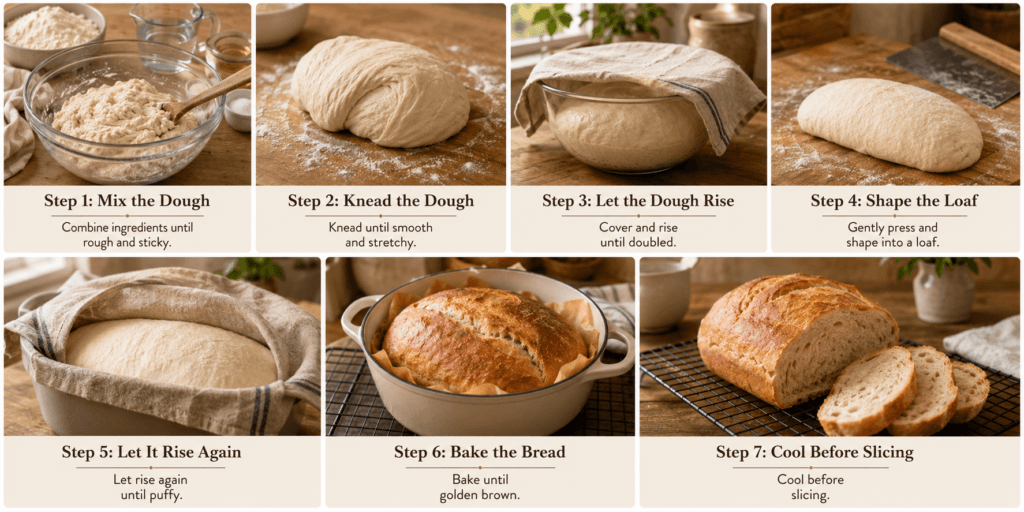
Step 1: Mix the Dough
You start by combining flour, yeast, warm water, salt, and any optional ingredients like sugar or oil.
At first, the dough may look rough and sticky. That is normal. As the flour absorbs water and you begin kneading, it will become smoother.
Step 2: Knead the Dough
Kneading helps develop gluten, which gives bread structure. Gluten is what helps the dough stretch and hold air bubbles as it rises.
To knead by hand, press the dough forward with the heel of your hand, fold it back, turn it slightly, and repeat. The dough should slowly become smoother and more elastic.
You do not need to knead perfectly. The goal is simply to work the dough until it becomes soft, smooth, and stretchy.
Step 3: Let the Dough Rise
After kneading, place the dough in a lightly oiled bowl, cover it, and let it rise in a warm place until it doubles in size.
This is called the first rise. It usually takes about one to two hours, depending on the room temperature and yeast activity.
Warm rooms help dough rise faster. Cool rooms make it rise slower.
Step 4: Shape the Loaf
After the first rise, gently press the dough down to release some air. Then shape it into a loaf.
For a loaf pan, shape it into a log and place it seam-side down in the pan. For a rustic loaf, shape it into a round and place it on a baking sheet.
Step 5: Let It Rise Again
The second rise helps the dough become lighter before baking. Cover the shaped loaf and let it rise again until it becomes puffy.
This rise is usually shorter than the first one.
Step 6: Bake the Bread
Bake the bread until it is golden brown and cooked through. The loaf should sound hollow when tapped on the bottom.
The smell of baking bread is one of the best parts of the process.
Step 7: Cool Before Slicing
This step is hard, but important. Let the bread cool before slicing so the inside can finish setting.
If you cut bread too soon, it may feel gummy or dense inside.
Easy Homemade Bread Recipe for Beginners
This is a simple beginner bread recipe you can use for your first loaf.
Ingredients
- 3 cups all-purpose flour or bread flour
- 2 1/4 teaspoons active dry yeast or instant yeast
- 1 cup warm water
- 1 tablespoon sugar or honey
- 1 teaspoon salt
- 2 tablespoons olive oil or melted butter
Instructions
In a large mixing bowl, combine the warm water, yeast, and sugar or honey. Let it sit for about 5 to 10 minutes if you are using active dry yeast. It should look slightly foamy. If you are using instant yeast, you can mix it directly with the flour, but letting it sit in water still works for a beginner-friendly method.
Add the flour, salt, and olive oil or melted butter. Stir until a rough dough forms. If the dough feels extremely dry, add water one tablespoon at a time. If it feels too sticky to handle, add a little flour, but do not add too much.
Turn the dough onto a lightly floured surface and knead for about 8 to 10 minutes. The dough should become smoother and more elastic. It can feel slightly tacky, but it should not stick heavily to your hands.
Place the dough in a lightly oiled bowl. Cover it with a clean towel and let it rise in a warm place until doubled in size. This usually takes 1 to 2 hours.
Once the dough has risen, gently press it down. Shape it into a loaf and place it in a greased loaf pan. Cover again and let it rise until puffy, about 30 to 60 minutes.
Preheat the oven to 375°F, or about 190°C. Bake the bread for 30 to 35 minutes, or until the top is golden brown and the loaf sounds hollow when tapped.
Remove the bread from the pan and let it cool on a rack before slicing.
How to Know If Your Dough Is Right
One of the biggest questions beginners have is whether the dough feels right. This takes practice, but there are simple signs to look for.
Good bread dough should feel soft, smooth, and slightly elastic. It may be a little tacky, but it should not be so sticky that you cannot handle it.
If the dough is too dry, it may feel stiff, rough, and difficult to knead. Add a small amount of water, one tablespoon at a time.
If the dough is too sticky, it may spread everywhere and cling heavily to your hands. Add a small amount of flour, one tablespoon at a time.
Avoid adding too much flour too quickly. This is one of the main reasons beginner bread turns out dense.
After kneading, the dough should look smoother than when you started. After rising, it should look puffy and roughly doubled in size.
Common Homemade Bread Mistakes Beginners Make
Every bread baker makes mistakes, especially at the beginning. The good news is that most bread problems are easy to understand once you know what caused them.
Using Water That Is Too Hot
Hot water can damage or kill yeast. If the yeast does not work, the bread will not rise properly.
Use warm water, not boiling or very hot water.
Using Old Yeast
Yeast can expire or lose strength over time. If your dough does not rise, old yeast may be the reason.
Store yeast properly and check the expiration date before baking.
Adding Too Much Flour
Too much flour can make bread dry, heavy, and dense. Beginners often keep adding flour because the dough feels sticky.
Add flour slowly and only as needed. Slightly tacky dough is usually better than dry dough.
Not Kneading Enough
If the dough is not kneaded enough, the bread may not have good structure. It may feel heavy or uneven.
Knead until the dough becomes smoother and more elastic.
Not Letting the Dough Rise Enough
Bread needs time. If you bake dough before it has risen properly, the loaf may be dense.
Let the dough double during the first rise and become puffy during the second rise.
Letting the Dough Rise Too Long
Over-proofed dough can collapse or bake unevenly. If dough rises too much and becomes weak, the final loaf may not hold its shape.
Watch the dough, not only the clock.
Cutting the Bread Too Soon
Fresh bread smells amazing, but slicing too early can make the inside gummy. Let the loaf cool before cutting.
Expecting Perfection on the First Try
Your first loaf does not need to look bakery-perfect. It only needs to teach you the process.
Bread making gets easier each time you do it.
How to Make Homemade Bread More Flavorful
Once you can make a basic loaf, you can start adding flavor. This is where homemade bread becomes fun.
Simple ways to add flavor include:
- Brush the top with butter after baking
- Add a little honey to the dough
- Use olive oil for a softer texture
- Add dried rosemary or thyme
- Add garlic powder
- Add seeds on top
- Mix in a little whole wheat flour
- Add oats
- Sprinkle flaky salt on top
- Add dried herbs
If you grow or preserve herbs, learning how to dry herbs gives you homemade rosemary, thyme, oregano, or basil to add to bread dough.
A simple rosemary bread can be made by adding dried rosemary to the dough. A garlic herb loaf can include dried oregano, thyme, and a little garlic powder. An olive oil herb bread can be served with soups, salads, or roasted vegetables.
Start with small amounts of herbs so the flavor does not become too strong.
How to Store Homemade Bread
Homemade bread does not usually contain the same preservatives as store-bought bread, so it may not last as long. This is normal.
Let bread cool completely before storing. If you store warm bread, moisture can build up and make the crust soft or encourage mold.
For short-term storage, keep bread at room temperature in a bread bag, bread box, or wrapped in a clean towel. It is usually best within 2 to 3 days.
Avoid storing bread in the fridge if possible because refrigeration can make bread dry out faster.
For longer storage, freeze bread. You can freeze the whole loaf or slice it first. Sliced bread is convenient because you can take out only what you need.
Freezing bread slices, making breadcrumbs, and using leftovers wisely are simple food preservation methods for beginners in the homestead kitchen.
Ways to Use Homemade Bread
A loaf of homemade bread can be used in many simple meals. It does not have to be perfect to be useful.
Use homemade bread for:
- Toast
- Sandwiches
- Soup side
- Garlic bread
- French toast
- Grilled cheese
- Croutons
- Breadcrumbs
- Bread pudding
- Open-faced sandwiches
- Breakfast toast
- Pantry meals
If a loaf turns out a little dry, do not throw it away. Dry bread can become croutons, breadcrumbs, French toast, or bread pudding.
If a loaf is slightly dense, it can still be toasted and served with butter, jam, soup, or eggs.
Homemade bread is forgiving because even imperfect loaves can be used well.
Can Homemade Bread Become a Side Hustle?
For many people, homemade bread starts as a kitchen skill, not a business. But over time, it can become part of a small income idea if you enjoy baking and local food rules allow it.
Once you feel confident baking, homemade bread can even connect to simple homesteading jobs for beginners if local food rules allow it.
Possible beginner ideas include:
- Selling simple loaves locally where allowed
- Making bread for family gatherings
- Offering seasonal bread boxes
- Teaching beginner bread workshops
- Sharing bread recipes on a blog
- Creating Pinterest content around from-scratch cooking
Before selling bread, always check your local food laws, labeling rules, and kitchen requirements. Start small and make sure the process stays enjoyable.
A side hustle should not take away the peace and purpose of simple living. It should grow naturally from a skill you already love.
Simple Bread-Making Schedule for Beginners
Bread takes time, but most of that time is waiting. Here is a simple schedule for a first loaf.
Morning or Afternoon Bread Schedule
9:00 — Mix dough
9:15 — Knead dough
9:30 — First rise
11:00 — Shape loaf
11:15 — Second rise
12:00 — Bake
12:35 — Cool
1:30 — Slice and enjoy
You can adjust the schedule based on your day. If your kitchen is cool, rising may take longer. If your kitchen is warm, the dough may rise faster.
Watch the dough more than the clock.
FAQ About Homemade Bread for Beginners
Is homemade bread hard to make?
Homemade bread is not hard once you understand the basic steps. You mix, knead, rise, shape, rise again, bake, and cool. The first loaf may feel new, but the process becomes easier with practice.
What is the best flour for beginner bread?
All-purpose flour is a good choice for beginner bread because it is easy to find and simple to use. Bread flour can also work well and may create a chewier loaf.
Can I make bread without a stand mixer?
Yes, you can make bread without a stand mixer. Bread has been made by hand for generations. You only need a bowl, a spoon, your hands, and a little patience.
Why did my bread not rise?
Bread may not rise if the yeast is old, the water was too hot, the room was too cold, or the dough did not have enough time. Check your yeast and let the dough rise in a warm place.
How long should bread dough rise?
The first rise usually takes 1 to 2 hours, or until the dough doubles in size. The second rise usually takes 30 to 60 minutes, or until the shaped loaf looks puffy.
Can I use instant yeast instead of active dry yeast?
Yes, instant yeast and active dry yeast can both be used in beginner bread recipes. Instant yeast can be mixed directly with flour, while active dry yeast is often dissolved in warm water first.
Why is my homemade bread dense?
Dense bread can happen when too much flour is added, the dough does not rise enough, the yeast is weak, or the dough is not kneaded enough. Start by checking yeast freshness and avoid adding too much flour.
Should bread cool before slicing?
Yes, bread should cool before slicing. Cutting too early can make the inside gummy because the crumb has not fully set yet.
How do I store homemade bread?
Store cooled bread at room temperature for 2 to 3 days in a bread bag, bread box, or clean towel. For longer storage, freeze slices and thaw as needed.
Can homemade bread be frozen?
Yes, homemade bread freezes well. Slice the bread first so you can remove only what you need. Wrap it tightly and freeze for longer storage.
Conclusion
Homemade bread for beginners is one of the most rewarding kitchen skills you can learn. It turns simple ingredients into something warm, useful, and comforting. You do not need fancy equipment, a perfect kitchen, or years of experience to begin.
Start with one simple loaf. Learn how the dough feels, how yeast works, how long your kitchen takes to rise dough, and how bread changes as it bakes. Your first loaf may not be perfect, but it will help you understand the process.
Over time, you can add herbs, seeds, honey, butter, whole wheat flour, or other flavors. You can bake sandwich bread, rustic loaves, rolls, or simple pantry bread for everyday meals.
Bread making is not only about the final loaf. It is about slowing down, using basic ingredients, and building confidence in your home kitchen.
Start with flour, water, yeast, salt, and patience. One loaf is enough to begin.
Want more beginner-friendly homesteading, from-scratch cooking, and simple living ideas? Subscribe to the Dreamsteading newsletter and get practical guides sent straight to your inbox.