How to Build Raised Garden Beds: An Easy Beginner’s Step-by-Step Guide
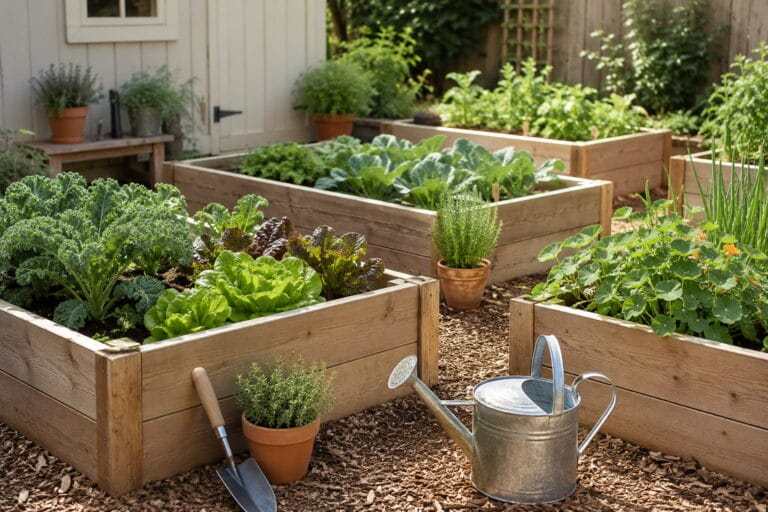
Learning how to build raised garden beds gives you a defined growing space where you can control the soil, organize crops, and avoid walking on the root zone. This beginner plan creates one open-bottom wooden bed measuring 4 × 8 ft (1.22 × 2.44 m) outside and approximately 11 in (28 cm) high.
The frame uses six 2 × 6 × 8 ft boards, one 4 × 4 × 8 ft post, and approximately 60 exterior-rated screws. A beginner with basic measuring, cutting, and drilling skills can usually finish the active work in 4–6 hours, or 6–8 hours when cutting and site preparation are included. A reasonable editorial cost estimate is $180–$400 excluding tools, with lumber, soil, delivery, and optional upgrades creating the largest differences.
Confirm sunlight, drainage, water access, lumber suitability, and underground-utility information before starting. This design is not an elevated planter, retaining wall, seating wall, or accessible-height structure. It should sit on safe, permeable ground where you can reach the center from both long sides.
In Short
Build a 48 × 96 in (1.22 × 2.44 m) open-bottom frame using two stacked courses of 2 × 6 lumber and six internal 4 × 4 supports. Difficulty is beginner to intermediate. Allow approximately 4–6 active hours, or 6–8 hours with cutting and site preparation. Estimated cost is $180–$400 excluding tools. Accurate cuts, square assembly, compatible exterior fasteners, stable placement, and suitable soil are the main requirements.
Key Takeaways
- The finished outside dimensions are 48 × 96 in, with an actual wall height of approximately 11 in.
- Four 45 in end boards fit between four full-length 96 in side boards.
- Four corner posts and two midpoint posts reinforce the frame against movement and outward soil pressure.
- Plan for approximately 24–27 cu ft (0.68–0.76 m³) of finished soil mix.
- Check both diagonals, level, fasteners, sharp edges, and wall straightness before filling.
- Keep traffic in the paths so the growing soil remains loose rather than compacted.
Project Overview
This plan creates a framed, open-bottom bed for vegetables, herbs, or flowers. Roots can extend into the underlying ground when that soil is safe and permeable. The 4 ft width lets most adults reach the center from either long side without stepping into the bed, while the 8 ft length supplies approximately 29 sq ft (2.7 m²) of internal growing area.
Two nominal 2 × 6 boards form each wall. Dressed 2 × 6 lumber commonly measures approximately 1½ × 5½ in (38 × 140 mm), so two stacked courses produce an actual wall height near 11 in rather than 12 in. Verify the actual boards you purchase before marking the posts.
Before buying materials, use the Dreamsteading raised garden bed planner to compare bed directions and pathway space.
Before You Start
Choose a Practical Location
Observe the proposed site before buying lumber or soil. Tomatoes, peppers, eggplants, and many other fruiting vegetables generally need at least 6–8 hours of direct sunlight. Leafy crops may tolerate less. Choose ground that drains after rain and is reasonably close to water.
Leave access along both long sides. A 3 ft (91 cm) path is a useful starting point, but carts and mobility devices may require more. Do not block gates, drainage routes, utilities, or property access.
Check Utilities and Soil History
Contact the appropriate utility-location service before driving stakes, excavating, or disturbing soil where buried services may be present. In the United States, submit an 811 request and follow the waiting period and instructions for your state.
If contamination is possible, obtain local soil testing or professional guidance. A shallow bed does not automatically isolate roots from unsafe ground.
Select Suitable Lumber
Cedar is the example material because it is workable and naturally decay resistant. Other suitable species vary by region. Avoid railroad ties, creosote-treated material, painted demolition wood, contaminated pieces, and unknown reclaimed lumber.
If you choose pressure-treated lumber, confirm that the current product label permits the intended residential ground-contact use, follow its handling instructions, and use compatible fasteners. Do not assume unidentified older treated wood uses a current preservative system.
Dimensions and Soil Calculation
| Measurement | US customary | Metric | Planning note |
|---|---|---|---|
| Outside length | 96 in | 243.8 cm | Full-length side boards |
| Outside width | 48 in | 121.9 cm | 45 in ends plus two 1½ in sides |
| Wall height | Approximately 11 in | Approximately 28 cm | Two actual 5½ in board widths |
| Inside length | Approximately 93 in | Approximately 236 cm | Between 1½ in end boards |
| Inside width | Approximately 45 in | Approximately 114 cm | Between side boards |
| Finished soil depth | Approximately 9½–10 in | Approximately 24–25 cm | Leaves watering and mulch space |
| Soil volume | Approximately 24–27 cu ft | Approximately 0.68–0.76 m³ | Includes modest settling allowance |
The 45 in end boards fit between two side boards that are approximately 1½ in thick: 45 + 1½ + 1½ = 48 in. Cutting the ends to 48 in would create an outside width near 51 in in this assembly configuration.
Obtain approximately 1 cubic yard (27 cu ft or 0.76 m³) of combined soil materials. A research-based starting range is roughly one-half to two-thirds quality topsoil and one-third to one-half finished plant-based compost, adjusted for the actual topsoil and a soil test. Avoid filling the bed entirely with compost or manure-based material.
Materials and Supplies
Materials
- 6 boards: Cedar 2 × 6 × 8 ft lumber
- 1 post: Cedar 4 × 4 × 8 ft lumber
- At least 75: 3 in exterior-rated structural or deck screws compatible with the lumber
- Approximately 1 cubic yard: Suitable topsoil and finished plant-based compost
- Approximately 3 cu ft: Suitable organic mulch for a thin layer after planting
- One approximately 4 × 8 ft piece: 1/2 in galvanized hardware cloth, optional where burrowing animals are a demonstrated problem
- As needed: Compactable mineral soil for minor leveling corrections
| Material | Quantity | Specification | Purpose |
|---|---|---|---|
| Frame lumber | 6 boards | 2 × 6 × 8 ft | Four long sides and four short ends |
| Support lumber | 1 post | 4 × 4 × 8 ft | Four corner and two midpoint supports |
| Fasteners | At least 75 | 3 in exterior-rated screws | Approximately 60 used plus spares |
| Soil mix | 24–27 cu ft | Quality topsoil and finished plant-based compost | Growing medium |
| Optional supplies | As needed | Mulch and 1/2 in galvanized hardware cloth | Surface cover and animal barrier |
Cut List
| Part | Quantity | Nominal material | Cut length | Purpose |
|---|---|---|---|---|
| Long side boards | 4 | 2 × 6 | 96 in (243.8 cm) | Two courses on each long side |
| Short end boards | 4 | 2 × 6 | 45 in (114.3 cm) | Two courses at each end |
| Corner posts | 4 | 4 × 4 | 11 in (27.9 cm) | Connect and reinforce corners |
| Midpoint posts | 2 | 4 × 4 | 11 in (27.9 cm) | Reinforce long walls |
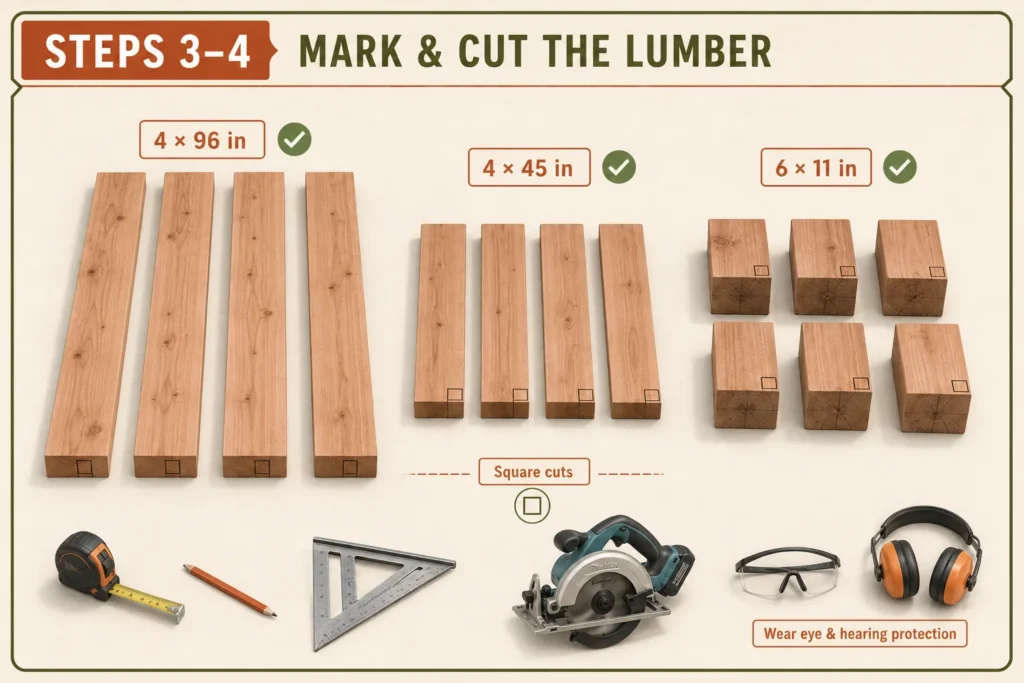
Leave four 2 × 6 boards at their full 96 in length. Cut two boards into two 45 in pieces each, leaving approximately 6 in of total waste per board before saw kerf. Six 11 in supports use 66 in of the 96 in post, leaving approximately 30 in before kerf.
Tools and Equipment
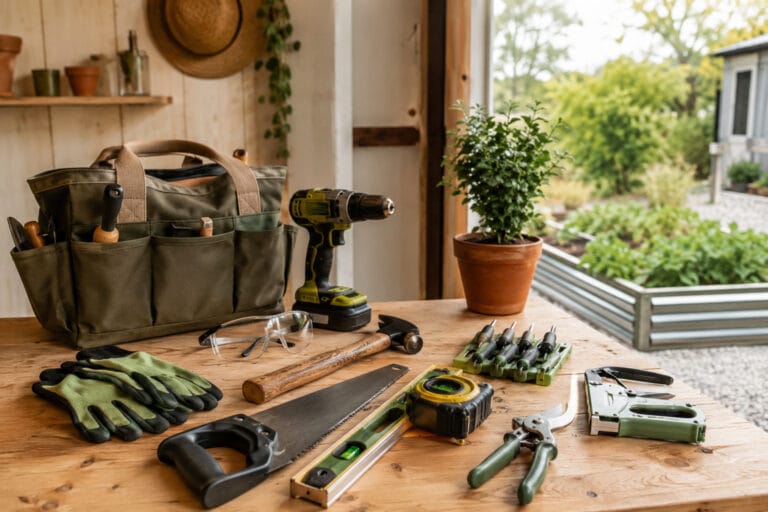
Tools
- Tape measure: Measures the footprint, diagonals, and cut lengths
- Pencil and speed square: Mark straight, square cut lines
- Circular saw or miter saw: Cuts boards and posts to length
- Drill and driver: Create pilot holes and install screws
- Compatible bits: Match the selected screws and pilot-hole requirements
- Clamps: Hold boards securely against posts
- Four-foot spirit level: Checks the site and frame
- Shovel and rake: Clear and level the footprint
- Aviation snips: Cut optional hardware cloth
- Wheelbarrow and garden fork: Move and blend soil
- Personal protective equipment: Safety glasses, hearing protection, suitable dust protection, gloves, and sturdy closed-toe footwear
A cordless drill and impact-driver combination kit can reduce bit changes during pilot drilling and fastening. A capable drill-driver also works. Review the Dreamsteading DIY and building tools guide if these tools are unfamiliar.
Safety Requirements
Safety first
Wear safety glasses and hearing protection while cutting or drilling. Use respiratory protection appropriate to wood dust and the lumber treatment. Support lumber securely, keep hands away from blades, and follow tool-manufacturer instructions. Wear gloves for rough lumber, soil, compost, and hardware cloth, but keep loose gloves away from rotating blades. Use sturdy closed-toe footwear. Obtain help when moving the assembled frame or bulk soil. Complete utility-location requirements before disturbing the ground. Do not use contaminated, creosote-treated, structurally damaged, or unidentified reclaimed wood. Professional help may be required for contaminated soil, major grading, retaining walls, inaccessible designs, or work near utilities and structures.
Use a pack of 3-inch exterior-rated structural or deck screws approved for the selected lumber. Pressure-treated lumber may require specific corrosion-resistant fasteners. Interior drywall screws are not designed for this damp outdoor application.
How to Build the Raised Garden Bed
Confirm and Mark the Location
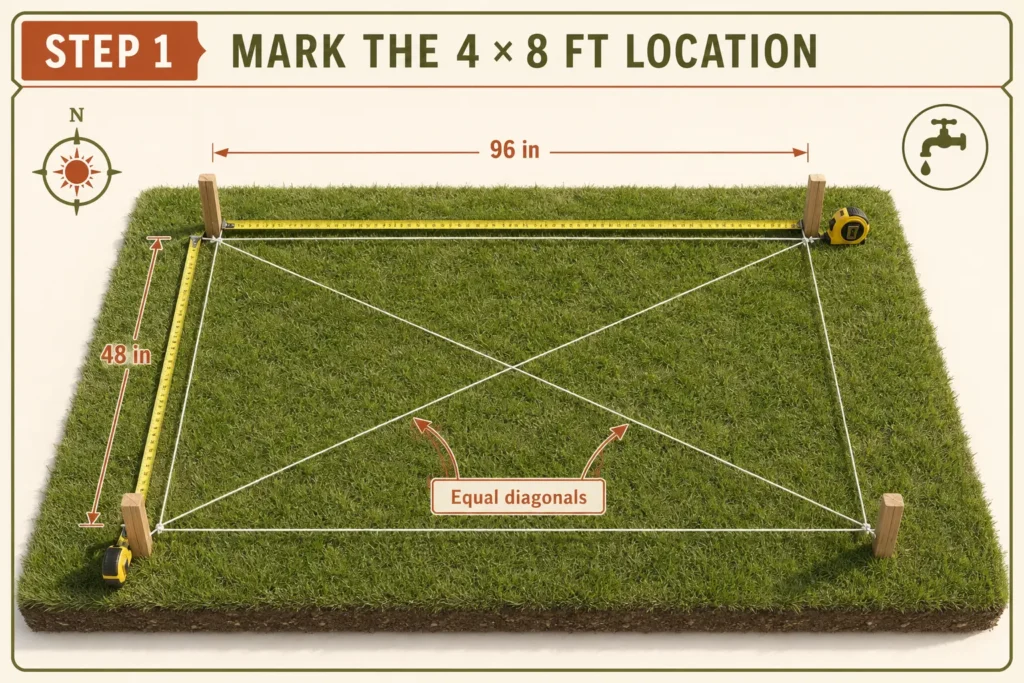
Mark a 48 × 96 in (1.22 × 2.44 m) rectangle with stakes and string, leaving access along both long sides. Check sunlight, drainage, water, clearance, and buried utilities. Adjust the corners until both diagonals match. Completion check: the footprint is 48 × 96 in, diagonals match within approximately 1/4 in (6 mm), and every side is accessible.
Prepare and Level the Ground
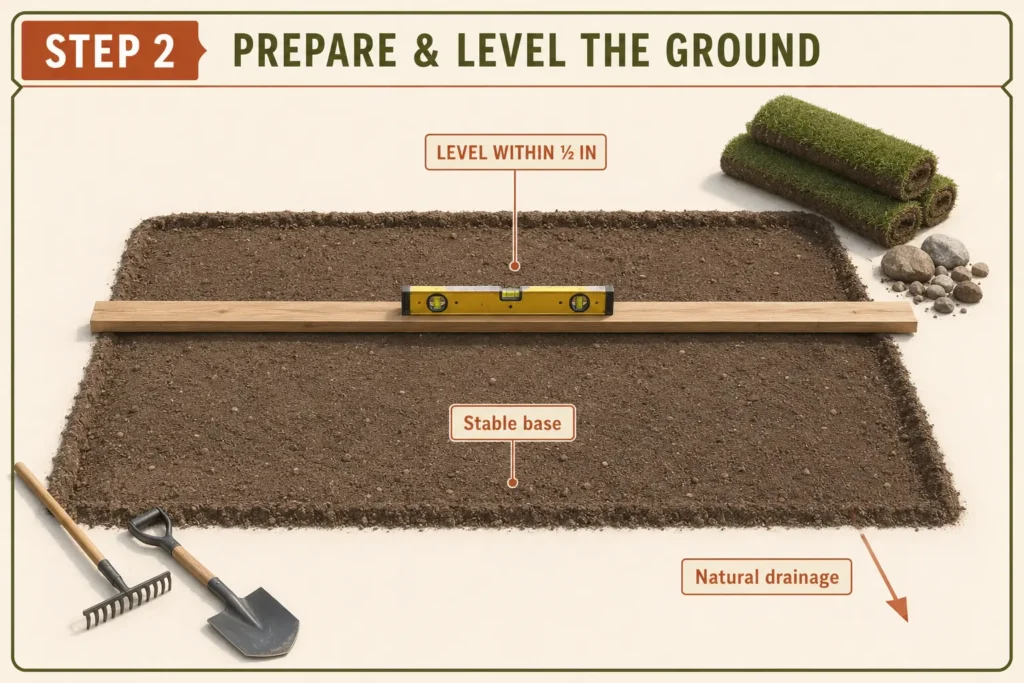
Remove weeds, roots, rocks, and debris after utility clearance. Check the footprint with a straight board and level. Remove small high spots and rebuild loose low areas with compactable mineral soil, not decomposable waste. Completion check: the base is stable, drains naturally, and is level within approximately 1/2 in (13 mm) end to end.
Inspect and Mark the Lumber
Inspect every piece for severe warping, rot, splits, metal, or treatment damage. Reserve four straight boards as full-length sides. Mark two 45 in (114.3 cm) pieces on each remaining board and six 11 in (27.9 cm) supports on the post, accounting for saw kerf. Completion check: cut lines are square, quantities match the cut list, and unsafe pieces are replaced.
Cut the Boards and Support Posts
Support each piece securely. Cut four 45 in ends, leave four sides at 96 in, and cut six 11 in supports. Follow the saw instructions and let the blade stop before setting it down. Ease sharp splinters without changing joint dimensions. Completion check: matching parts are equal, ends are square, and quantities are 4 sides, 4 ends, and 6 supports.
Assemble the First Board Course
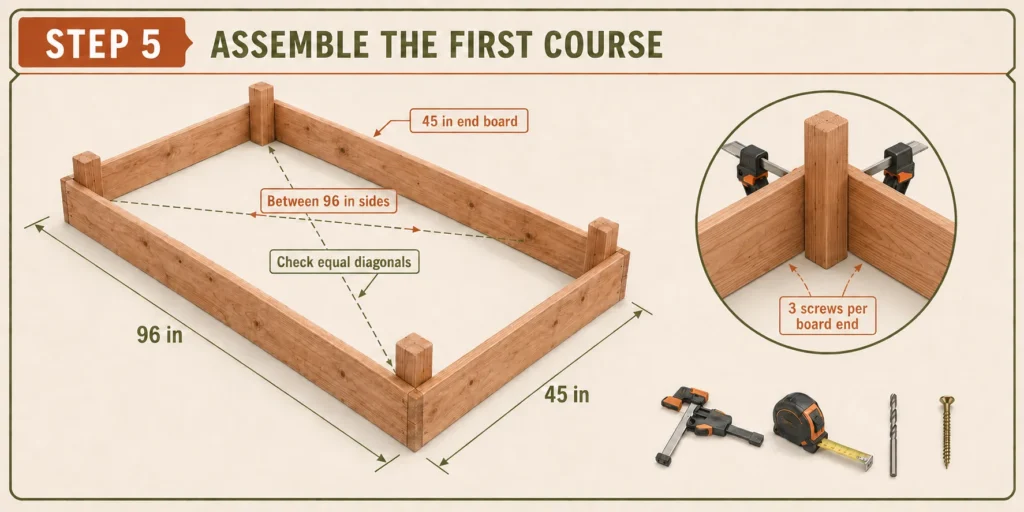
On a flat surface, fit two 45 in ends between two parallel 96 in sides. Clamp one 11 in post inside each corner, flush with the lower edges. Drill pilot holes and drive three 3 in screws through every board end into its post, using 24 screws. Completion check: outside dimensions are 48 × 96 in, the course lies flat, and diagonals match within approximately 1/4 in.
Add the Second Board Course
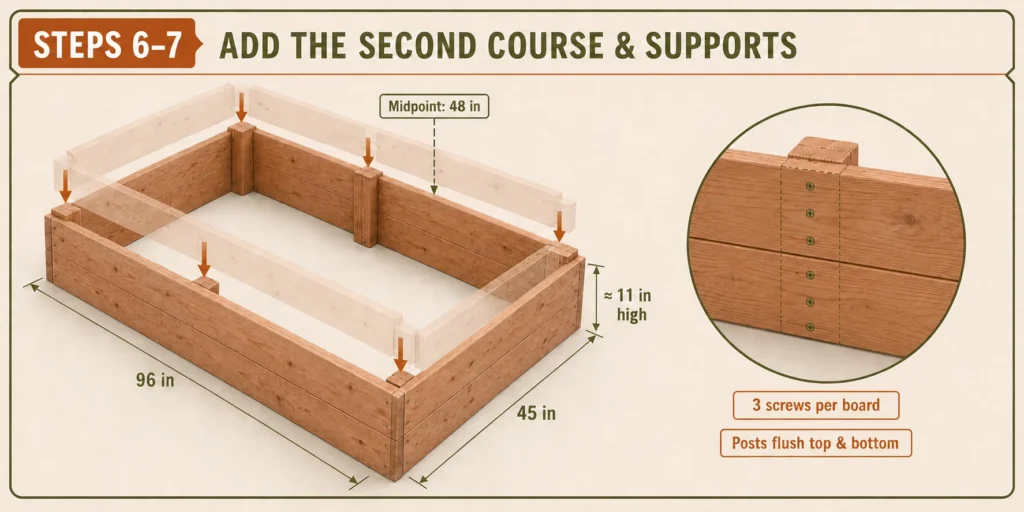
Align the second board course directly above the first. Clamp each board and install three screws at every upper board-to-post connection, offset from the lower fasteners. Use 24 screws and do not force badly warped lumber into place. Completion check: courses align, joints are tight, posts are flush, and wall height is approximately 11 in (28 cm).
Install the Midpoint Supports
Mark the center of each long wall at 48 in. Hold one 11 in post vertically against each inside face, flush with the edges. Drive three screws through each stacked board into its support—six per wall and 12 total. Completion check: both posts are centered and secure, and the walls remain straight.
Position and Verify the Frame
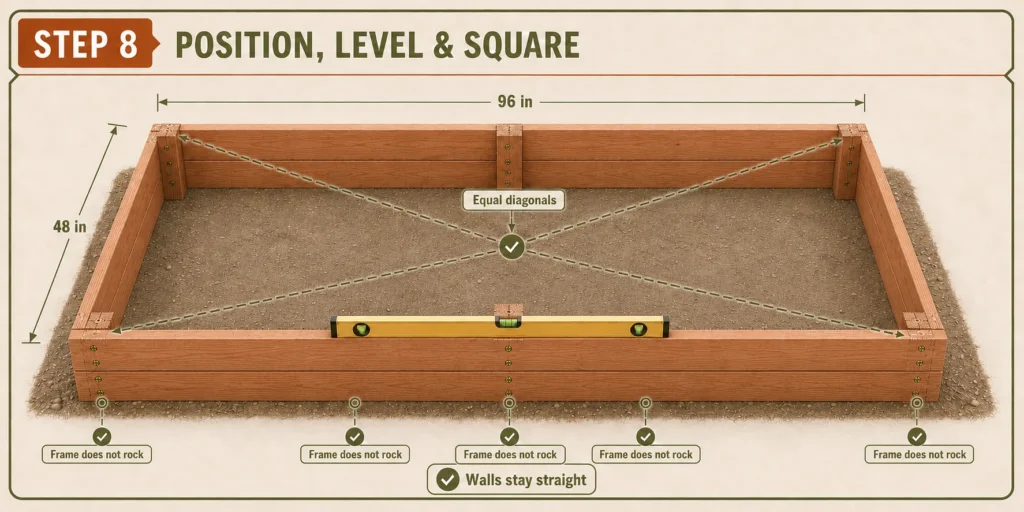
With adult help, lift the empty frame onto the footprint without dragging it. Check both directions with a four-foot level and remeasure the diagonals. Correct high ground rather than propping corners on loose scraps. Completion check: the frame does not rock, the top is reasonably level, diagonals match, and walls remain straight.
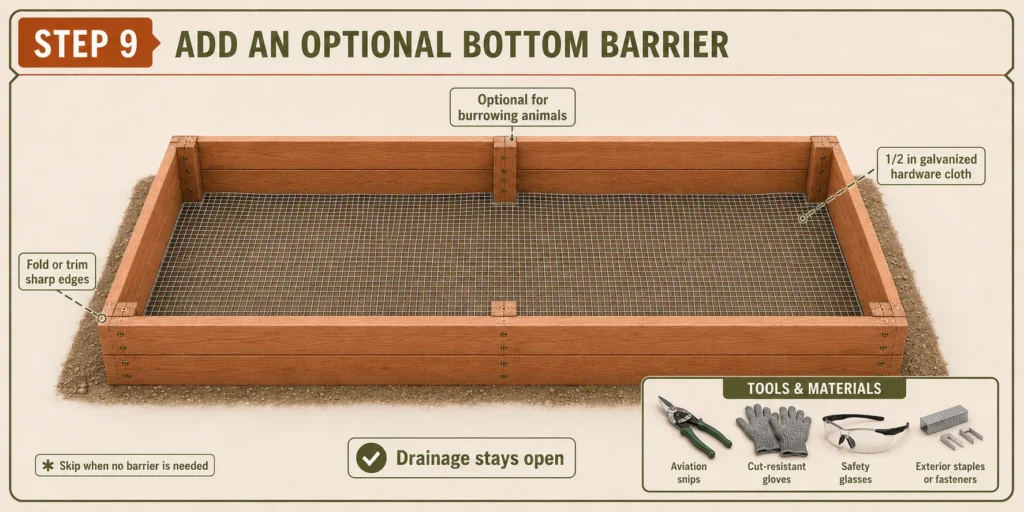
Add an Optional Bottom Barrier
Most beds on suitable ground need no liner. Where burrowing animals are a demonstrated problem, fit 1/2 in galvanized hardware cloth across the bottom. Secure overlaps and trim or fold sharp edges while wearing eye protection and cut-resistant gloves. Never block drainage with plastic. Completion check: the barrier covers the footprint and has no exposed wire.
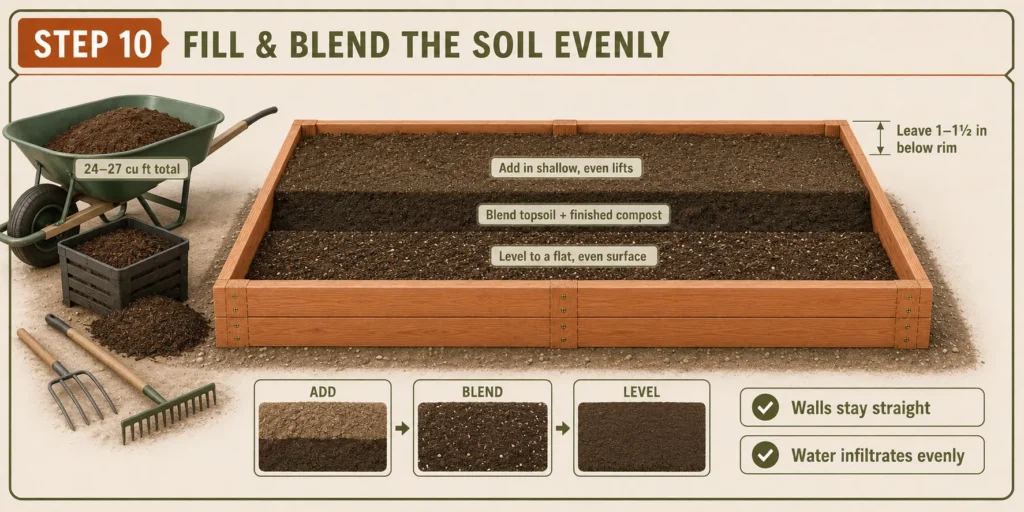
Fill and Blend the Soil Evenly
Add soil in shallow, even lifts. Blend suitable topsoil and finished plant-based compost gently, using approximately 24–27 cu ft total and adjusting to soil-test results. Stop 1–1½ in (25–38 mm) below the rim, water lightly, and top up after settling. Completion check: the surface is even, water infiltrates, and walls do not bow.
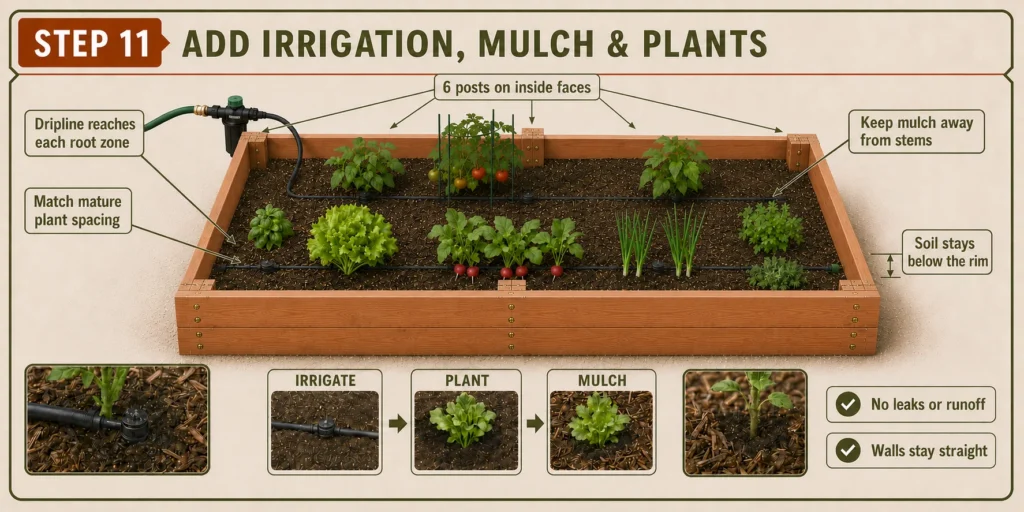
Install Irrigation, Mulch, and Plants
Plan watering before planting. Install dripline according to its pressure, filter, spacing, and flushing requirements, or water by hand. Plant for the season, sunlight, depth, and mature spacing, then mulch without burying stems. Completion check: water reaches roots without runoff, plants have space, and soil remains below the rim.
A 1/2-inch galvanized hardware cloth roll with a clearly stated wire gauge is useful only where a real burrowing-animal problem justifies it. Plastic garden mesh is not an equivalent barrier for determined rodents.
An adjustable raised-bed drip irrigation kit with a pressure regulator, filter, and flushable end caps can simplify watering. Confirm that every component matches the water source and manufacturer limits.
For planting ideas, compare these easy vegetables for beginner gardeners. Acclimate indoor-grown plants before transplanting by following the seedling hardening-off guide.
Cost and Time Summary
Lumber species, regional availability, bulk-soil quality, delivery, optional hardware cloth, and irrigation create the largest cost differences. Precut lumber may reduce active time. Poor access, extensive leveling, bulk-soil movement, or a finish can extend the schedule. If you apply a finish, follow its full drying or curing instructions before adding soil or plants.
Planning, shopping, and delivery are separate from active construction time. Soil movement may take longer than frame assembly, especially when the delivery point is far from the bed. Divide heavy work into manageable loads and obtain help rather than rushing.
Common Raised-Bed Building Mistakes
- Cutting the ends to 48 inches: Ends fitted between the side boards must be 45 in to create a 48 in outside width.
- Building beyond your reach: A bed that is too wide encourages stepping on and compacting the soil.
- Skipping diagonal checks: Correct side lengths do not guarantee square corners.
- Using interior fasteners: Drywall screws are unsuitable for a damp outdoor frame.
- Omitting midpoint supports: Long walls are more likely to bow as moist soil presses outward.
- Filling entirely with compost: Too much compost can create water-management and nutrient problems.
- Using unknown reclaimed lumber: Unidentified treatments, paint, rot, oil, and embedded metal create avoidable risks.
Troubleshooting
| Problem | Likely cause | How to correct it |
|---|---|---|
| Diagonals do not match | Frame is racked out of square | Loosen fasteners slightly, shift opposite corners until diagonals match, and retighten |
| Frame rocks | High ground or loose material beneath a corner | Lift the empty frame and correct the underlying grade with stable mineral soil |
| Long wall bows outward | Missing reinforcement, warped lumber, loose screws, or uneven filling | Stop filling, remove pressure as needed, and repair or replace the affected parts |
| Board splits near a screw | Missing pilot hole, fastener too close to an edge, or excessive torque | Replace seriously damaged material and correct pilot-hole size and screw position |
| Water collects at one end | Uneven frame, soil surface, or underlying drainage | Check level and correct the actual grade or drainage problem before planting |
| Soil level drops | Loose mix settled after watering | Top up with compatible tested soil rather than uncomposted waste |
Completion and Quality Checklist
- Outside frame dimensions are approximately 48 × 96 in (1.22 × 2.44 m).
- Wall height is approximately 11 in (28 cm).
- Diagonal measurements match within approximately 1/4 in (6 mm).
- The frame sits firmly without rocking and is reasonably level in both directions.
- All six support posts are secure and free from serious splitting.
- Approximately 60 compatible exterior screws are seated without being overdriven.
- No splintered edge, sharp wire, or protruding fastener creates a contact hazard.
- Long walls remain straight after filling.
- Soil remains approximately 1–1½ in below the rim.
- Water infiltrates without pooling or overflowing one side.
- Paths provide safe access to both long sides.
Maintenance and Aftercare
Inspect the lower board edges, corners, midpoint posts, and fasteners at the beginning and end of each growing season. Tighten suitable loose fasteners and replace boards or posts that have become structurally weak. Do not conceal rot or splitting with trim.
Prevent soil and mulch from accumulating against the outside walls where they trap moisture. Correct irrigation leaks and path drainage promptly. If you use a finish, renew it only according to the product instructions and confirm suitability for the intended garden application.
Raised beds can dry quickly. Check moisture below the surface, flush dripline, clean filters, and winterize where required. Test the soil periodically and amend according to crop needs and results.
Frequently Asked Questions
Why are the end boards 45 inches instead of 48 inches?
Each 45 in end fits between two side boards that are approximately 1½ in thick. The calculation is 45 + 1½ + 1½ = 48 in outside. A 48 in end in this configuration would make the outside width approximately 51 in.
How much soil does this raised bed need?
Plan for approximately 24–27 cu ft (0.68–0.76 m³). The exact amount depends on actual inside dimensions, fill depth, settling, and the space left below the rim. One cubic yard provides 27 cu ft.
Does the raised garden bed need a wooden bottom?
No. An open-bottom bed on safe, permeable soil normally drains naturally and lets roots enter the ground. Beds over decks, balconies, or pavement require a different design that accounts for drainage and saturated weight.
Can the bed go directly over grass?
Yes, if the soil and drainage are suitable. Cut vegetation low, remove persistent weeds, and level the footprint. Current extension guidance notes that barriers are usually unnecessary and that cardboard may temporarily slow infiltration, so use local guidance rather than treating cardboard as mandatory.
Is pressure-treated lumber suitable for a vegetable bed?
Currently labeled residential ground-contact lumber is an available option, but preservative systems and local guidance vary. Follow the product label and use compatible fasteners. Avoid railroad ties, creosote-treated wood, CCA-treated reclaimed lumber, and unidentified older material.
Start With One Bed
This 4 × 8 ft raised garden bed is a manageable first build with enough room for several vegetables or herbs. Accuracy matters most at the 45 in end cuts, square assembly, midpoint reinforcement, stable placement, and soil-volume calculation.
Build one bed, observe its sunlight, drainage, watering, crop spacing, and maintenance through a growing season, and keep simple notes. If the dimensions and access work well in your garden, repeat the verified plan rather than changing several variables at once.
Sources and Further Reading
- University of Minnesota Extension: Raised Bed Gardens — current guidance on siting, width, materials, soil mixtures, barriers, watering, and maintenance.
- Oregon State University Extension: Raised Bed Gardening — peer-reviewed guidance on access, dimensions, framing materials, soil, and paths.
- U.S. Environmental Protection Agency: Overview of Wood Preservative Chemicals — current information on CCA, creosote, and residential wood preservatives.
- U.S. Environmental Protection Agency: Chromated Arsenicals — handling and disposal information for older CCA-treated material.
- 811 Before You Dig: State Information — state-specific utility-location procedures and waiting requirements.
“`