How to Build a Simple Trellis: An Easy DIY Garden Project for Beginners
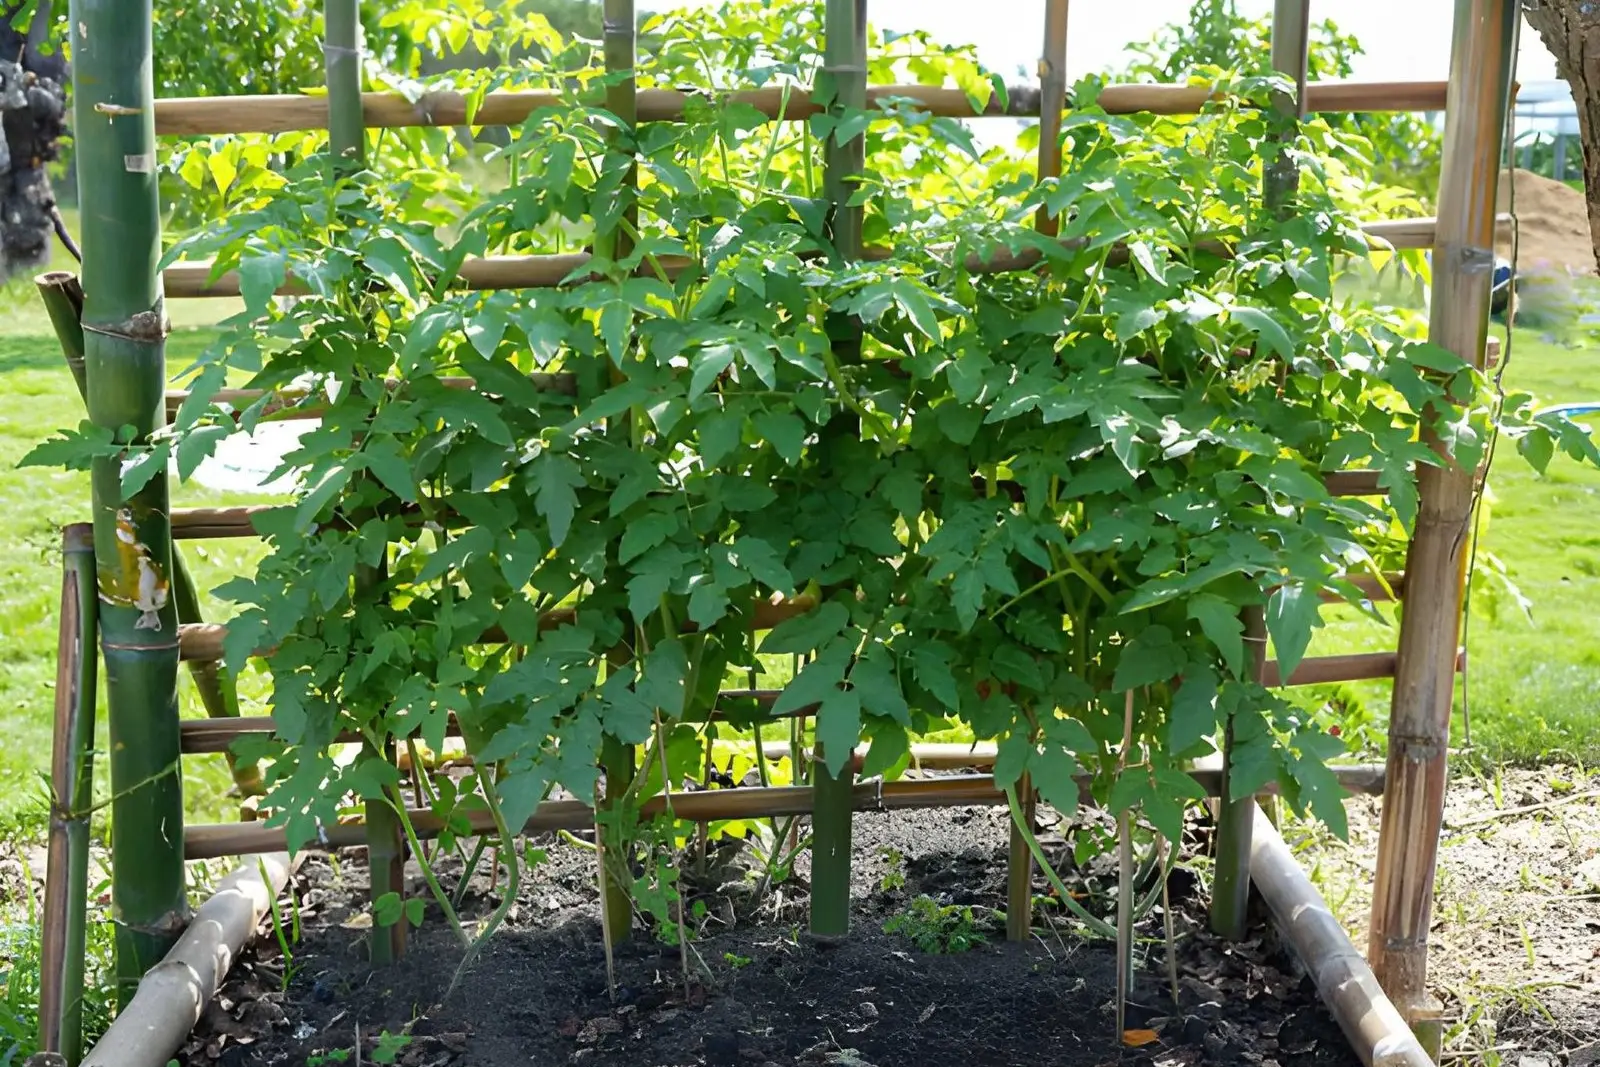
Learning how to build a simple trellis gives you an orderly, space-saving support for pole beans, peas, cucumbers, and other lightweight climbing plants. This beginner project creates a freestanding cedar frame that measures 6 ft (1.83 m) wide and 6 ft high above the soil, with galvanized welded-wire mesh for vines to grip.
The design is suitable for an in-ground garden or beside a raised bed. It is not engineered for children to climb, for use as a gate or fence, or for supporting heavy pumpkins and large squash. Wind, frost depth, loose soil, and unusually heavy crops may require deeper footings, stronger bracing, or a locally appropriate design.
In Short
Build this beginner trellis with two 8-ft cedar 4×4 posts, one 72-in cedar 2×4 top rail, and one 60 × 72-in galvanized welded-wire panel. Allow about 3–5 active hours and approximately $60–$120, excluding tools. The finished structure stands 6 ft wide and 6 ft high above grade and supports lightweight climbing vegetables.
Key Takeaways
- The fixed example measures 72 in (1.83 m) wide from outside post face to outside post face and 72 in high above grade.
- Each 8-ft cedar post is buried approximately 24 in (61 cm); local soil, frost, and wind conditions may require a deeper footing.
- A 60 × 72-in galvanized welded-wire panel sits 6 in (15 cm) above soil to reduce constant soil contact and make maintenance easier.
- Use exterior-rated structural screws and galvanized or stainless mesh fasteners compatible with cedar.
- This trellis is intended for lightweight vines, not climbing, swinging, fencing, or major structural loads.
Project Overview
This project creates a flat trellis that keeps vines off the ground and makes growth easier to guide and inspect. University of Minnesota Extension guidance supports trellising beans, peas, cucumbers, and small squash; heavier fruit may need slings or ground space.
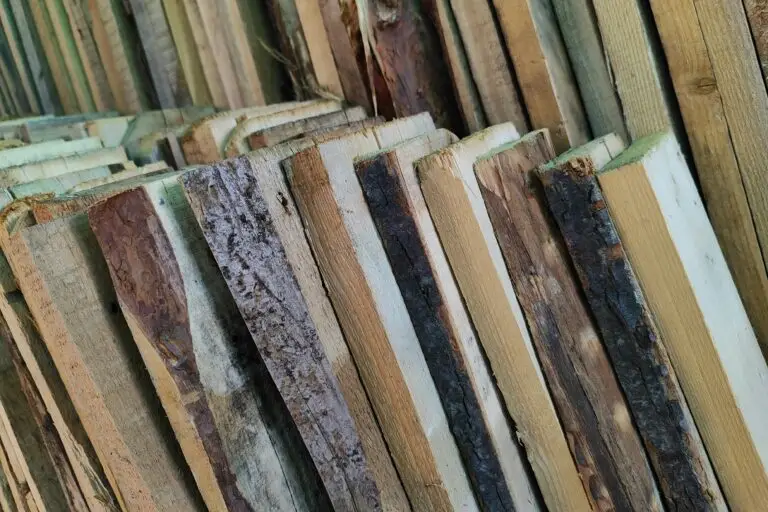
The frame uses cedar because it offers natural outdoor durability without requiring a finish. If you want to compare cedar with other suitable choices, review the best wood for garden projects before purchasing lumber. This article treats the trellis as a DIY Projects guide with a gardening use; the planned parent guide, Beginner Outdoor DIY Projects, remains a future internal-link opportunity because no published canonical URL has been verified.
You should be comfortable measuring, drilling, driving screws, cutting wire, and digging. Ask for help with awkward materials. Consult a qualified local professional near utilities, in unstable soil, or where a falling trellis could enter a public path.
Before You Start
Choose the crop before buying materials. Pole beans and tall peas need support, while bush varieties generally do not. Cucumbers and other light vines also work. Large melons, pumpkins, and heavy squash can overload this frame.
Choose suitable sunlight and access. North–south placement can distribute light, but wind and shade on shorter crops may matter more. Leave room to reach both sides. For planting ideas, use the beginner-friendly vegetable guide and companion planting basics.
Before digging in the United States, call 811 or use your state’s 811 process. Check local setbacks, easements, and height limits. Look overhead and never carry long posts where they could contact an electrical conductor.
Finished Dimensions and Cut List
Nominal 4×4 lumber usually measures about 3-1/2 × 3-1/2 in (89 × 89 mm), and nominal 2×4 lumber usually measures about 1-1/2 × 3-1/2 in (38 × 89 mm). The plan uses those common actual dimensions. Measure the lumber you purchase before laying out the post holes.
| Part | Quantity | Cut or finished size | Purpose |
|---|---|---|---|
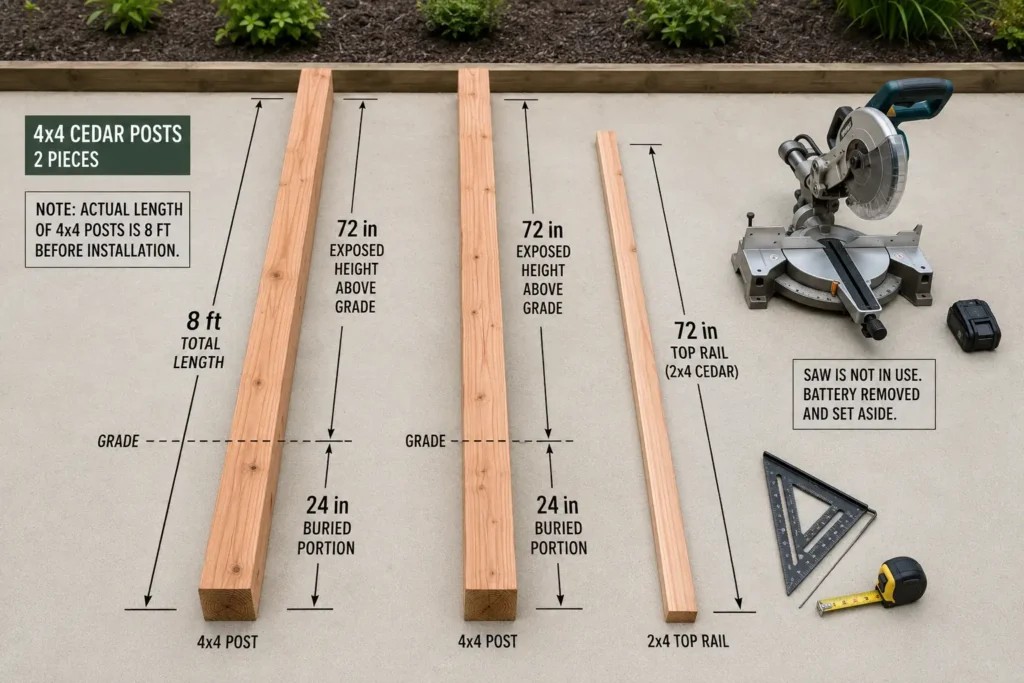
| Cedar 4×4 post | 2 | 8 ft (2.44 m), no cut | Approximately 24 in buried and 72 in exposed |
| Cedar 2×4 top rail | 1 | 72 in (1.83 m) | Spans across both front post faces |
| Galvanized welded-wire panel | 1 | 60 × 72 in (1.52 × 1.83 m) | Climbing surface |
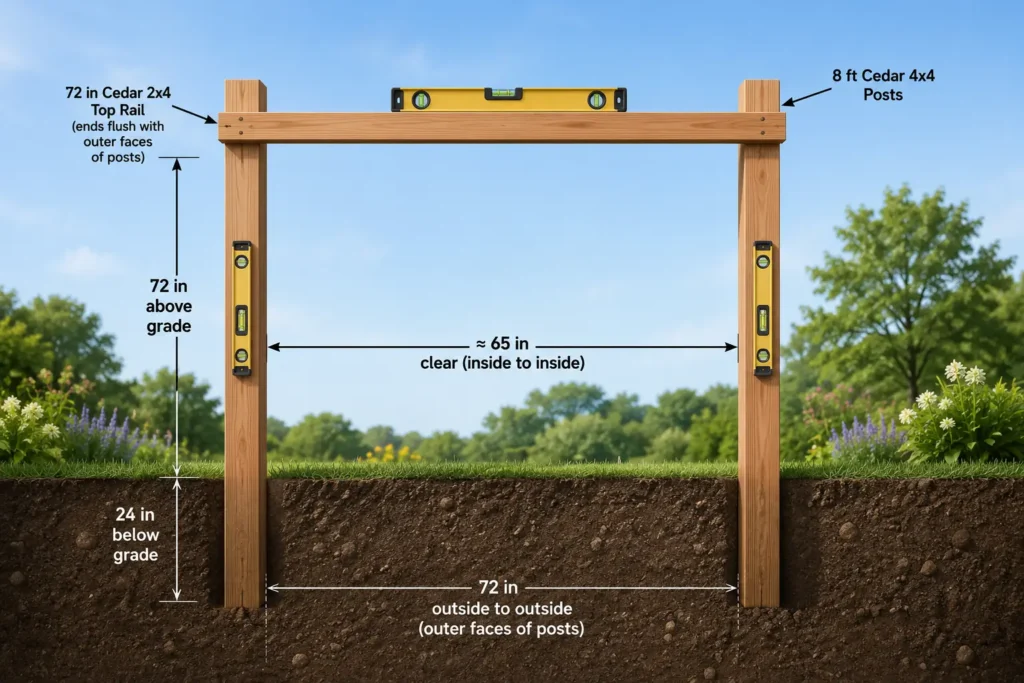
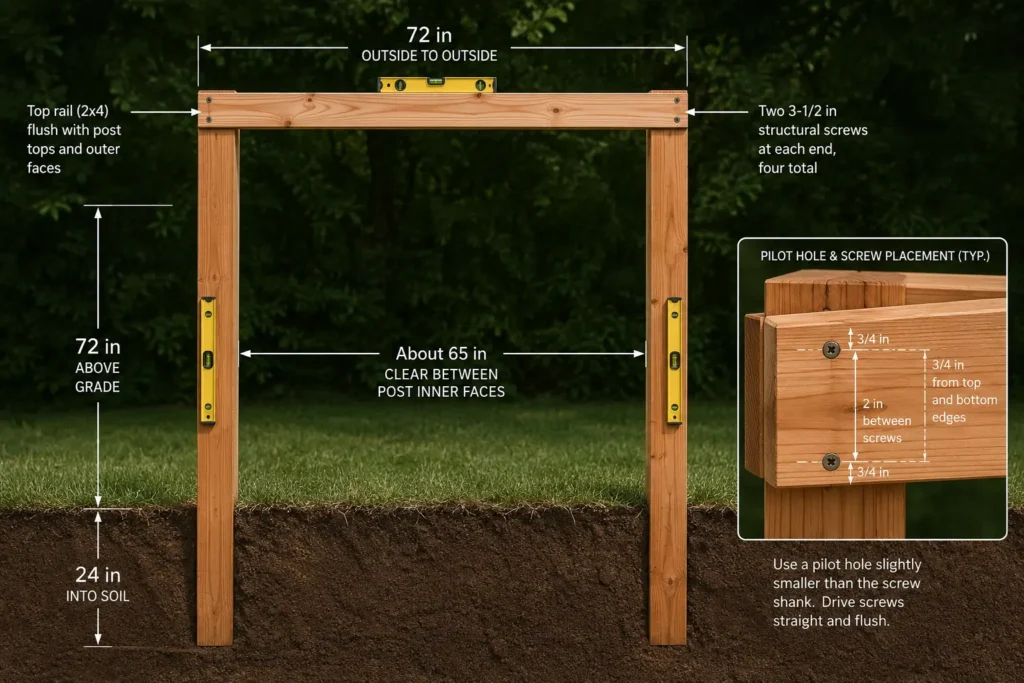
The 72-in rail finishes flush with the outside faces of the posts, leaving approximately 65 in (1.65 m) between their inner faces. The wire panel spans the full 72-in width across the front post faces. Its lower edge sits 6 in above grade, and its upper edge sits about 6 in below the top rail.
Materials and Supplies
Materials
- 2: Cedar 4×4 posts, 8 ft long
- 1: Cedar 2×4 board, at least 8 ft long, cut to a 72-in top rail
- 1: Galvanized welded-wire panel, 60 × 72 in; 2 × 4-in openings are practical for many climbing crops
- 4: Exterior structural screws, approximately 3-1/2 in long, approved by the manufacturer for the connection and wood species
- 20–24: Galvanized poultry-net staples or approved exterior mesh fasteners
- About 1–2 cu ft: Compactable gravel for the post-hole bases, depending on hole width
- As needed: Excavated soil or compactable backfill suitable for the site
- Optional: Exterior wood finish labeled for the intended outdoor garden use
- Optional: Soft plant ties and fabric slings for vines or individual fruit
For a durable outdoor trellis, use cedar 4×4 posts, galvanized welded-wire fencing, and exterior structural screws rated for the intended connection.
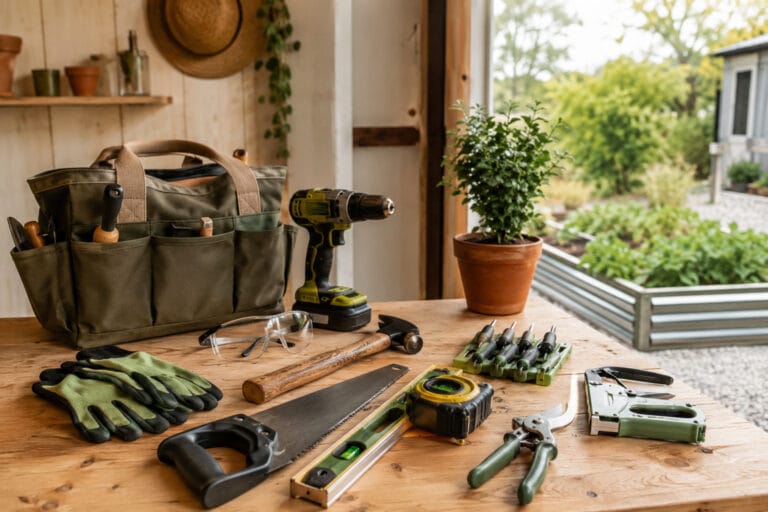
Tools and Equipment
Tools
- Tape measure: Marks the rail cut, post depth, width, and mesh position.
- Speed square or combination square: Guides a square rail cut and checks the frame corners.
- Circular saw or miter saw: Cuts the 2×4 top rail to 72 in.
- Drill/driver and suitable bits: Drills pilot holes and installs structural screws.
- Post-hole digger and shovel: Create and clean the two post holes.
- Carpenter’s level: Checks each post in two directions and checks the top rail.
- Clamps: Hold the rail and mesh while fasteners are installed.
- Wire cutters or aviation snips: Trim welded wire when required.
- Hammer or approved fastening tool: Installs the selected mesh fasteners.
- Temporary braces: Hold posts plumb during backfilling.
If you are still assembling a basic kit, Dreamsteading’s beginner DIY and building tools overview explains common tool roles. Choose a manual post-hole digger and compound-action wire cutters. Select tools that fit your strength, wire gauge, and site conditions.
Safety Requirements
Safety first
Wear safety glasses while cutting wood, drilling, driving fasteners, or trimming wire. Use hearing protection with power saws and gloves when carrying lumber or handling mesh; keep gloves away from rotating blades and bits. Support the workpiece, follow every tool manufacturer’s instructions, and disconnect power or remove the battery before adjusting a tool. Treat cut wire as sharp: bend it inward, grind it smooth when appropriate, or install protective caps. Confirm underground utility locations and overhead clearance before digging or lifting posts. Brace each post until backfill is fully compacted. This garden trellis is not a climbing structure for children and must not support swings, hammocks, gates, or people.
How to Build a Simple Trellis Step by Step
Choose and Mark the Trellis Location
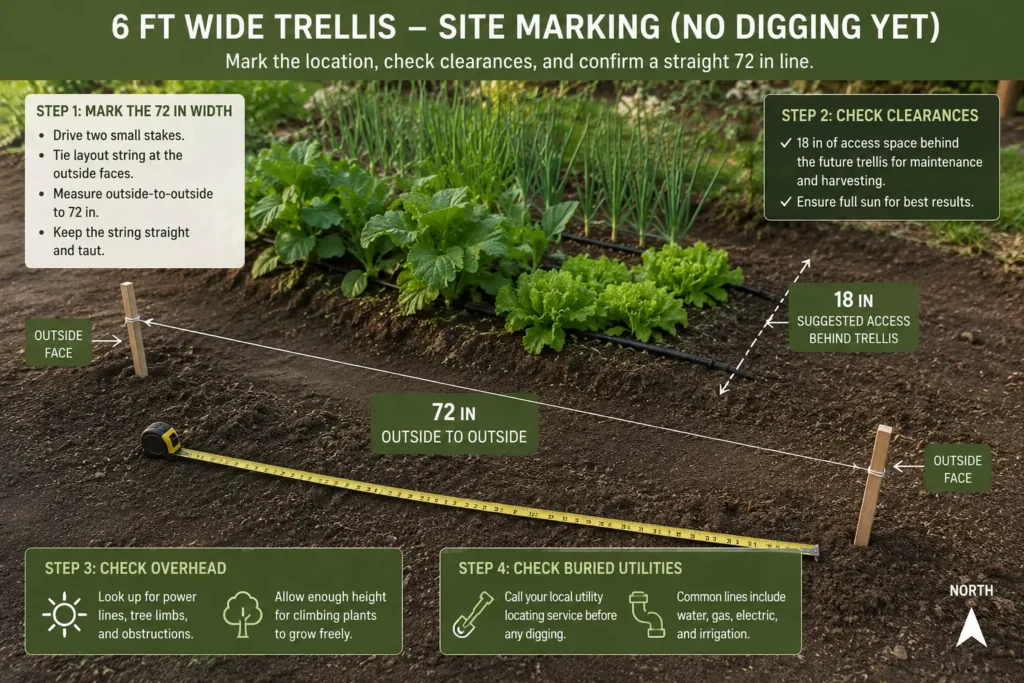
Choose a level or gently sloped garden edge with suitable sunlight and access. Keep clear of gates, narrow paths, overhead conductors, and underground services. Complete utility location before digging.
Drive two stakes for the outer post faces. Stretch a string between them and measure 72 in (1.83 m) outside-to-outside. Check the projected shade and leave about 18 in (46 cm) of rear access where possible.
Completion check: the line is straight, the measured outside width is 72 in, the area is cleared for safe digging, and the location does not obstruct normal movement through the garden.
Cut and Prepare the Cedar Parts
Reject badly split, decayed, or damaged lumber. Keep both 8-ft 4×4 posts full length. Measure the 2×4 twice, mark a square line, and cut one 72-in (1.83-m) rail. Smooth splinters and sharp edges.
Mark a line 24 in (61 cm) from the bottom of each post. This is the example burial depth, not a universal footing requirement. If local frost depth, soft soil, or wind exposure calls for deeper installation, obtain locally appropriate guidance and use longer posts rather than reducing the 72-in exposed height.
Completion check: the rail is exactly 72 in long with a square cut, both posts remain 8 ft long, and the 24-in burial marks match.
Dig Two Post Holes
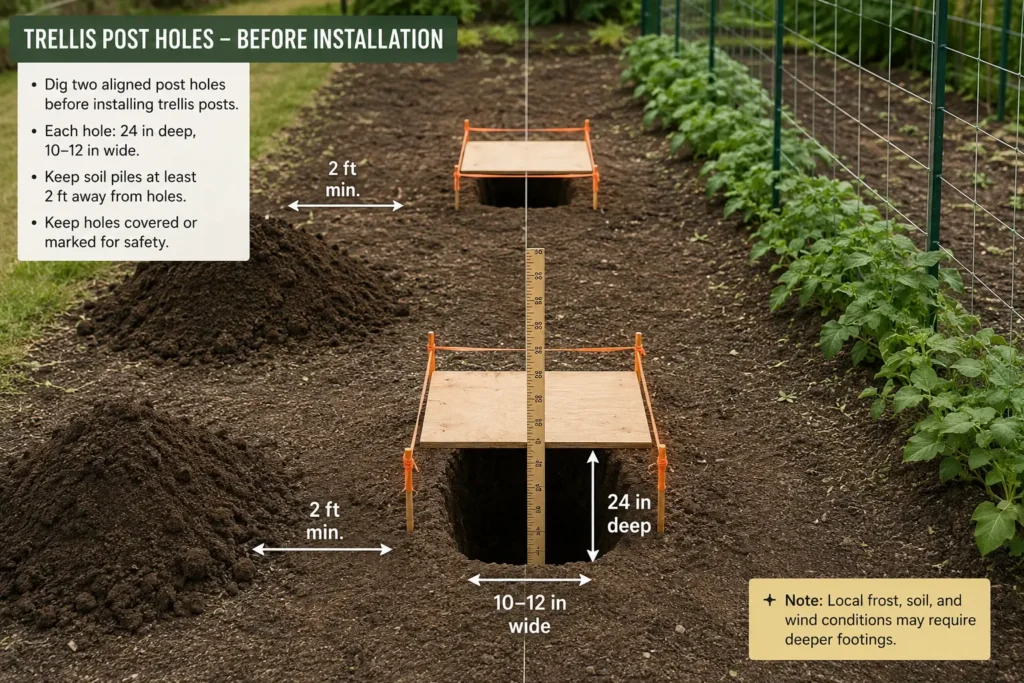
Mark the hole centers so the installed posts will finish 72 in apart from outside face to outside face. Dig two holes approximately 10–12 in (25–30 cm) wide and deep enough to place 4 in (10 cm) of compacted gravel below 24 in of buried post. Keep excavated soil and tools away from the edges.
Make the sides reasonably vertical and remove loose material from the bottom. Do not enter or reach deeply into an unstable hole. Stop if you encounter an unmarked pipe, cable, unusual fill, contaminated soil, or continuously collapsing sides.
Completion check: the holes are aligned, similar in depth and width, and positioned to produce the specified 72-in outside width.
Set the First Post Plumb
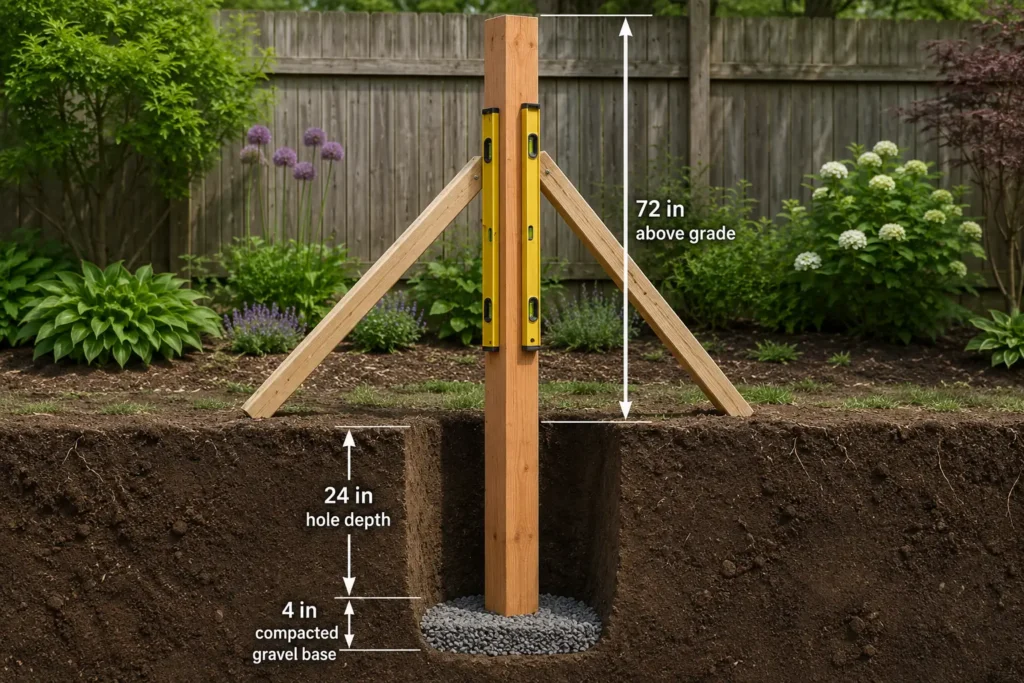
Tamp 4 in of gravel in the first hole. Set the post with its 24-in mark at finished grade. Level one face, then an adjacent face, until both read plumb.
Add two temporary braces. Place suitable backfill in 4–6-in (10–15-cm) lifts, compact evenly, and recheck plumb after every lift.
Completion check: 72 in of post remains above grade, the post is plumb in both directions, and firm hand pressure does not loosen the compacted base.
Align and Set the Second Post
Set the second post over 4 in of compacted gravel. Clamp the 72-in rail across the same front faces. Align its ends flush with the outside post faces to establish the finished width.
Level the rail temporarily and adjust the second post until both post tops match. Check the second post for plumb on two adjacent faces. Brace it, then add and compact backfill in thin, even lifts while repeating the width, height, and plumb checks.
Completion check: the posts are plumb, their tops are level, the outside-to-outside width is 72 in, and the clear opening between nominal 4×4 posts is approximately 65 in.
Fasten the Top Rail
Clamp the rail across the front faces, flush with the post tops and outside faces. Mark two staggered fastener locations at each end, following the screw maker’s edge-distance instructions.
Drill pilot holes when the fastener maker or cedar condition calls for them. Drive two 3-1/2-in exterior structural screws through the rail into each post. Do not substitute drywall screws or unidentified indoor fasteners. Stop when the heads seat firmly; overdriving can crush wood fibers and weaken the connection.
Completion check: four structural screws secure the rail, the rail remains level, the ends are flush, and neither connection shifts under moderate hand pressure.
Trim and Position the Wire Panel
Lay the 60 × 72-in panel flat. If trimming is necessary, follow one wire and use cutters rated for the gauge. Wear eye protection and cut-resistant gloves. Bend sharp tails inward or cap them.
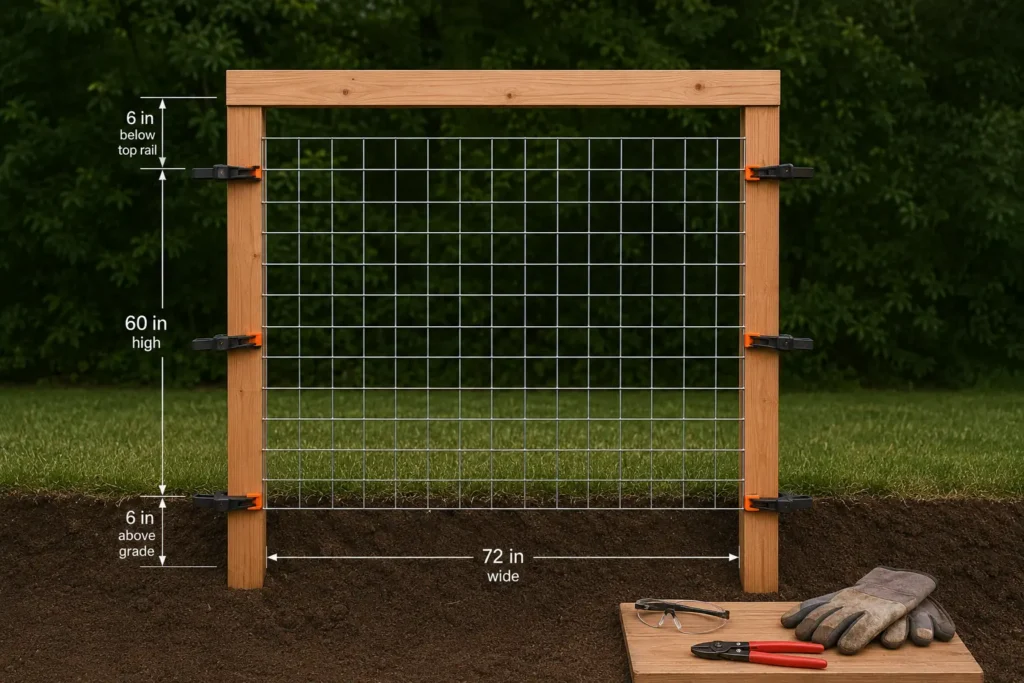
Lift the panel into position against the front faces of the posts—the same side as the top rail. Center it across the 72-in width. Set the bottom edge 6 in above finished grade and the top edge approximately 6 in below the rail. Clamp the mesh at both upper corners and near the lower corners.
Completion check: the panel is square, flat, centered, safely edged, and held with equal 6-in clearances above the soil and below the top rail.
Secure the Mesh to the Frame
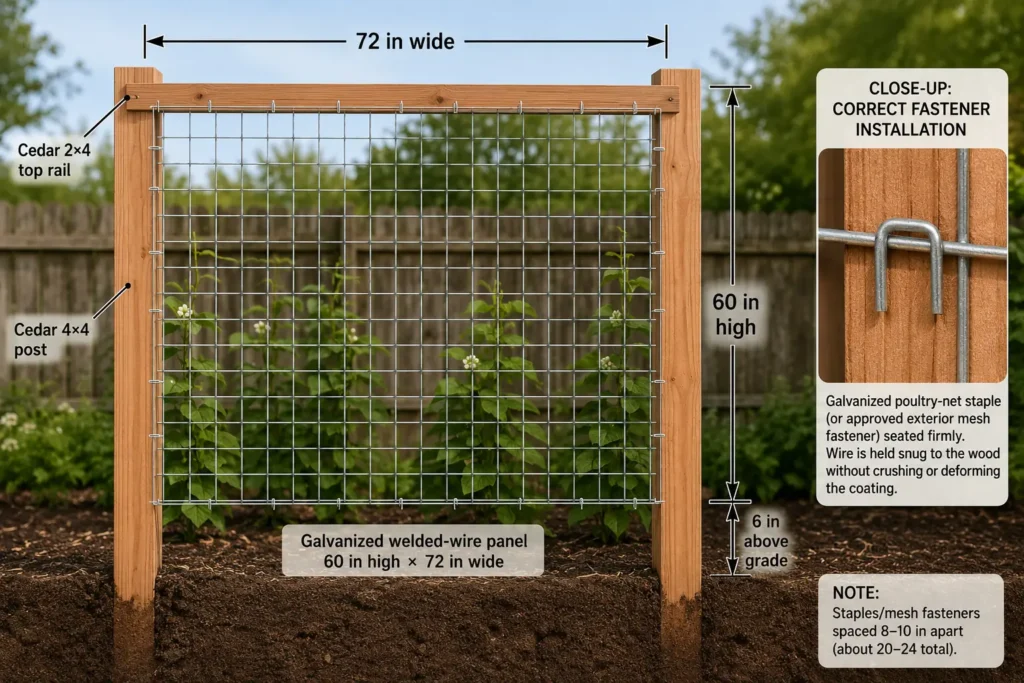
Fasten the mesh to both posts and the rail with galvanized poultry-net staples or another exterior fastener suitable for mesh and cedar. Work from the upper center toward the corners, then down both posts without distorting the grid.
Space fasteners approximately 8–10 in (20–25 cm) apart along the supported perimeter, using about 20–24 fasteners for this layout. Seat each fastener firmly enough to retain the wire while leaving its coating and shape intact. Do not place fingers behind the fastening point.
Completion check: every edge is retained, the mesh does not rattle or bow, no staple is loose or overdriven, and all cut ends remain protected.
Inspect and Finish the Trellis
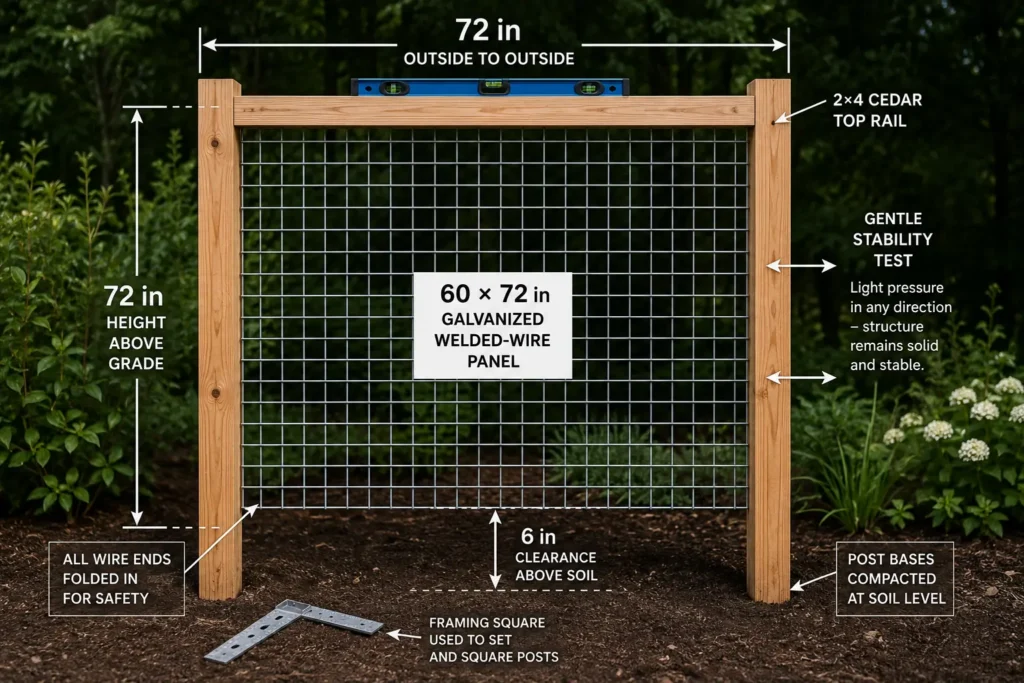
After the bases are firm, remove the braces. Check both posts for plumb, the rail for level, and each connection for square. Press gently from both sides; the frame should not rock or lean.
Run a gloved hand near—but not directly along—each mesh edge to locate projecting wire. Correct sharp points before planting. If applying a finish, use one labeled for the wood, exterior exposure, and intended garden setting, and follow its drying and recoat instructions.
Completion check: the trellis is 72 in wide and 72 in high above grade, the mesh starts 6 in above soil, all edges are safe, and the frame remains stable under a gentle push.
As stems lengthen, guide them through the openings or secure them with loose, soft ties. Never cinch a tie around a growing stem. Check cucumber or squash fruit so it does not become trapped in the mesh. Add a fabric sling when fruit weight begins to pull on the vine, and keep large pumpkins or heavy squash off this lightweight design. Completion check: young vines contact the mesh without tight ties, plant crowns remain clear, and no crop load is bending the rail or panel.Plant and Train Lightweight Vines
Plant a suitable lightweight climber at the base, following its label for spacing and depth. University of Minnesota Extension guidance recommends placing pole-bean supports at planting time and supports simple netting or string trellises for beans and peas.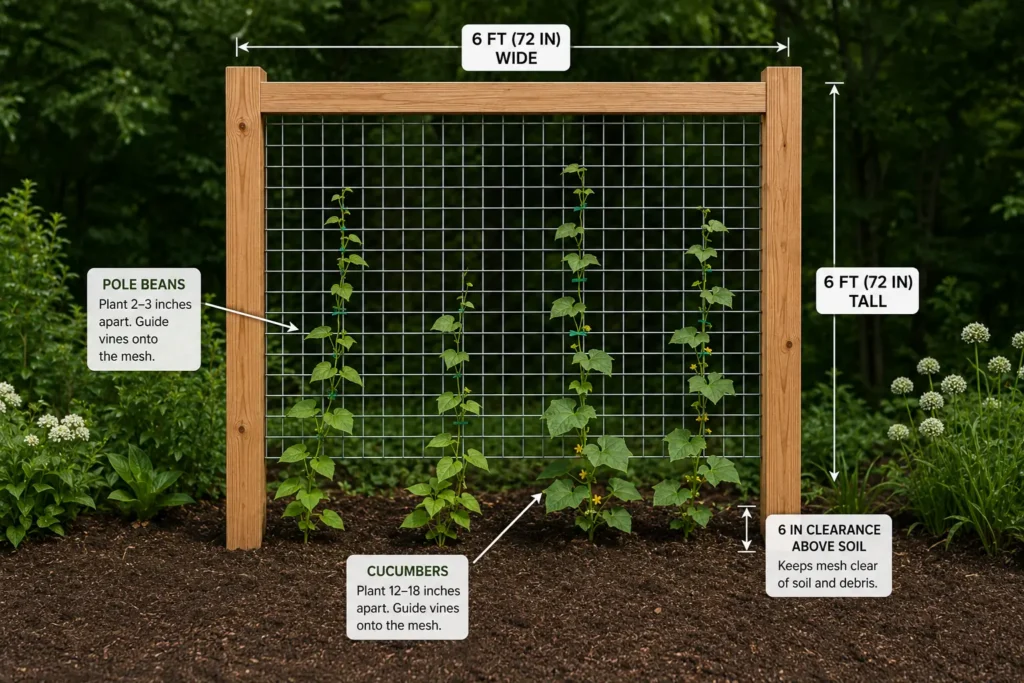
Cost and Time Summary
Cedar grade, wire gauge, fastener type, and regional material prices affect the total. Hard soil, roots, deeper local footing requirements, and careful mesh trimming add time. Reusing sound exterior-rated materials may reduce cost, but do not reuse corroded mesh, split posts, or unidentified fasteners.
Common Trellis-Building Mistakes
- Installing supports late: Digging around mature roots can damage plants. Build before planting or while seedlings are small.
- Ignoring mature weight: A frame that carries peas may not carry pumpkins. Match the support to the crop.
- Measuring post centers: This changes the width. Use the rail to establish the outside faces.
- Poor compaction: Surface-only tamping leaves loose soil below. Compact thin lifts and recheck plumb.
- Wrong fasteners: Use exterior structural screws and compatible galvanized or stainless mesh fasteners.
- Mesh at soil level: Moisture and tools damage wire. Keep the 6-in gap.
- Sharp ends: Fold, smooth, or cap every cut edge.
Troubleshooting
| Problem | Likely cause | Practical solution |
|---|---|---|
| Post leans after installation | Loose backfill, shallow footing, or soft soil | Remove the crop load, brace the frame, reopen the base as needed, reset plumb, and compact suitable backfill in thin lifts. Seek local advice if the soil remains unstable. |
| Top rail is not level | Post heights differ or a post settled | Correct the post base before adding plants. Do not hide significant settlement by forcing the rail out of square. |
| Mesh bows or rattles | Fasteners are too widely spaced or the panel was attached unevenly | Re-square the panel and add compatible fasteners at roughly 8–10-in spacing without crushing the wire. |
| Fasteners stain the cedar | Corrosion or incompatible metal | Replace them with approved exterior fasteners compatible with cedar and correct any trapped-water condition. |
| Vines will not climb | Unsupported young growth or unsuitable growth habit | Guide stems gently with loose soft ties. Confirm the variety is a climbing rather than bush type. |
| Fruit pulls on the vine | The developing crop is too heavy for its stem | Add a broad fabric sling tied to the wire frame, or move future heavy-fruited crops to a stronger support or the ground. |
Completion and Quality Checklist
- The outside faces of the posts measure 72 in apart.
- Both posts extend approximately 72 in above finished grade and remain plumb in two directions.
- The 72-in top rail is level, flush with both post tops, and secured with two approved structural screws per post.
- The 60 × 72-in welded-wire panel is flat, square, and securely fastened.
- The mesh bottom remains 6 in above soil and its top remains about 6 in below the rail.
- No wire end, screw, staple, or splinter creates a snag or sharp point.
- The frame does not rock or loosen under a gentle push from either side.
- The intended crop is lightweight enough for the structure, with slings planned for any fruit that needs individual support.
Maintenance and Seasonal Care
Inspect at planting, monthly during growth, after severe wind, and after harvest. Replace loose fasteners with compatible hardware. Correct leaning before vines hide movement or add weight.
Remove dead vines without bending the mesh. Clear soil and weeds from the base, maintain the 6-in gap, and use any finish only as its label directs.
If the trellis stands beside a raised bed, inspect both structures independently. Dreamsteading’s raised-bed gardening guide helps with crop planning, while the step-by-step raised-bed build covers the separate bed structure.
Frequently Asked Questions
What vegetables grow well on this simple trellis?
Pole beans, tall peas, cucumbers, and other lightweight climbers are suitable. Check mature size. Heavy pumpkins, squash, and melons need stronger support or ground space; smaller fruit may require slings.
Can this trellis attach directly to a raised garden bed?
It can stand beside a raised bed, but thin bed boards may not carry wind and crop loads. Independent ground posts provide a clearer load path. Otherwise, use a design made for the bed.
Does the trellis have to run north to south?
No. North–south placement can distribute light, but shade, access, wind, boundaries, and nearby crops also matter. Avoid unnecessarily shading sun-loving plants.
Can pressure-treated lumber replace cedar?
Treated products vary by preservative and approved use. Follow the current label, manufacturer guidance, and local garden recommendations, and use compatible fasteners. This fixed plan specifies cedar.
Should the posts be set in concrete?
This lightweight example uses compacted gravel and suitable backfill. Concrete may suit some sites but complicates removal. Let local frost, wind, soil, and rules determine the footing.
How long will a cedar garden trellis last?
Service life varies with wood grade, climate, drainage, hardware, load, and care. Keep mesh above soil, clear post bases, correct movement early, and replace corroded hardware.
Build Upward Without Overcomplicating the Garden
A carefully aligned trellis turns a small strip of garden into useful vertical growing space. Keep the project reliable by holding every part to the same plan: 72-in overall width, 72-in exposed height, a 60 × 72-in mesh panel, exterior-compatible fasteners, and a stable base suited to local conditions.
Once the frame passes the stability and sharp-edge checks, plant an appropriate climbing crop and guide new growth while it is flexible. The most useful next step is choosing from easy vegetables for beginner gardeners and matching the variety’s mature habit to the support.
Sources and Further Reading
- University of Minnesota Extension: Trellises and cages to support garden vegetables — supports crop suitability, lightweight netting guidance, vine training, and fruit-sling recommendations.
- University of Minnesota Extension: Growing beans in home gardens — supports installing pole-bean supports at planting time and using simple stake-and-twine trellises.
- University of Minnesota Extension: Growing peas in home gardens — supports trellising tall vining pea varieties with stakes and string or netting.
- 811 Before You Dig — provides the US starting point for requesting underground utility-location services before digging.
“`